October 16, 2023
How to Record a PowerPoint Presentation (with Audio)

Mike
Elevate your PowerPoint presentations with this comprehensive guide on creating captivating, self-paced narrations, enhanced with transformative tools and the power of software like Tella.
Table of contents
Record with PowerPoint's built-in features
Record with OBS
Record with Tella
Other solutions
Things to do before you start recording
Tips for creating engaging PowerPoint recordings
Conclusion
Record with PowerPoint's built-in features
Engaging virtual presentations are essential in today's world. This guide will walk you through recording a PowerPoint presentation with voiceover. Doing this makes your presentation more professional and polished for your audience. Let's begin.
Step 1: Open your PowerPoint presentation
First, open the presentation you'd like to record with voice-over. This guide will be for he 365 version of PowerPoint, but bear in mind you can still do this in PowerPoint versions all the way back to 2013. The settings are pretty much the same, just maybe in a slightly different place.
This doesn't work, however, on the Web version of PowerPoint.
Whatever version you're using, ensure all your slides and content are ready for narration. This will save time and provide a smoother recording experience. Far better than simply making it up as you go along.
Step 2: Prepare for recording
Navigate to the slide where you want to start your recording. If you're planning to record the entire presentation, start with the first slide.
Step 3: Start the recording
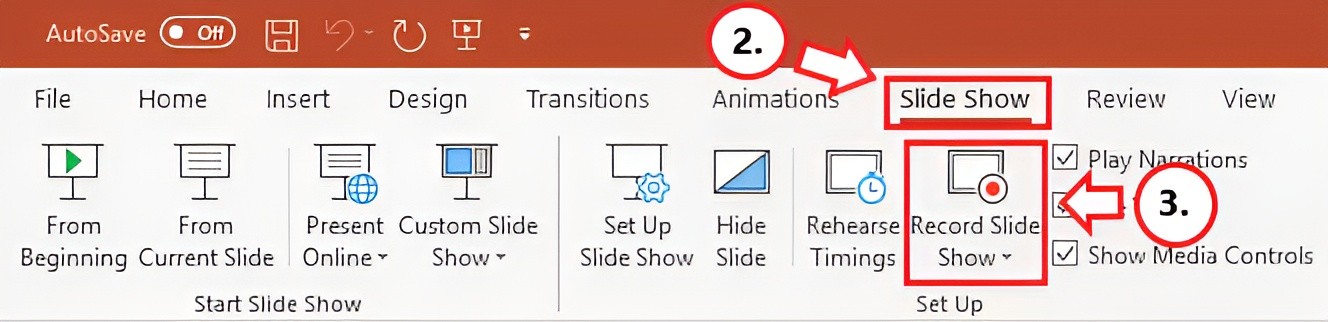
In the PowerPoint menu, select the Slide Show tab. From here, click on Record Slide Show. This will open the recording window with two options to choose from:
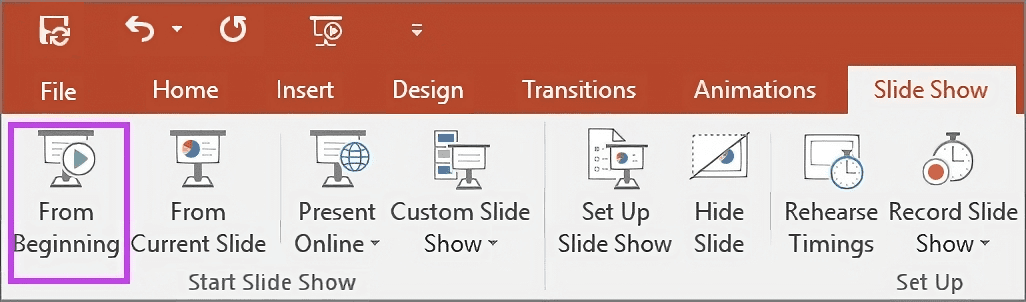
Record from Current Slide: This option allows you to start recording from your selected slide.
Record from Beginning: This option enables you to record the entire presentation starting from the first slide.
Click on your preferred option to proceed with the recording.
Step 4: Recording the narration and timings
When you're ready to start recording, click on the red Record button (round circle with a dot in the center). A three-second countdown will begin, and once it reaches zero, start speaking to record your voiceover.
Remember that the transition between slides isn't recorded, so pause your narration during slide transitions and resume speaking once the next slide appears.
Step 5: Manage your recording
During the recording, you have several tools at your disposal:
Pause: Use this button to pause your recording if needed.
Stop: Click this button to end your recording.
Replay: This allows you to review your recording.
Pen, Highlighter, or Eraser: Use these tools to mark up your slides during the recording, if desired.
Step 6: Edit or remove narration and timings
If you're not satisfied with your narration or timings, you can remove or edit them:
If you're still in recording mode, click on Clear.
Choose one of the following options:
Clear Recording on Current Slide: To delete the narration and timings on the current slide.
Clear Recording on All Slides: To delete the narration and timings from all slides at once.
Consider re-recording the sections that need improvement.
Step 7: Save and share your presentation
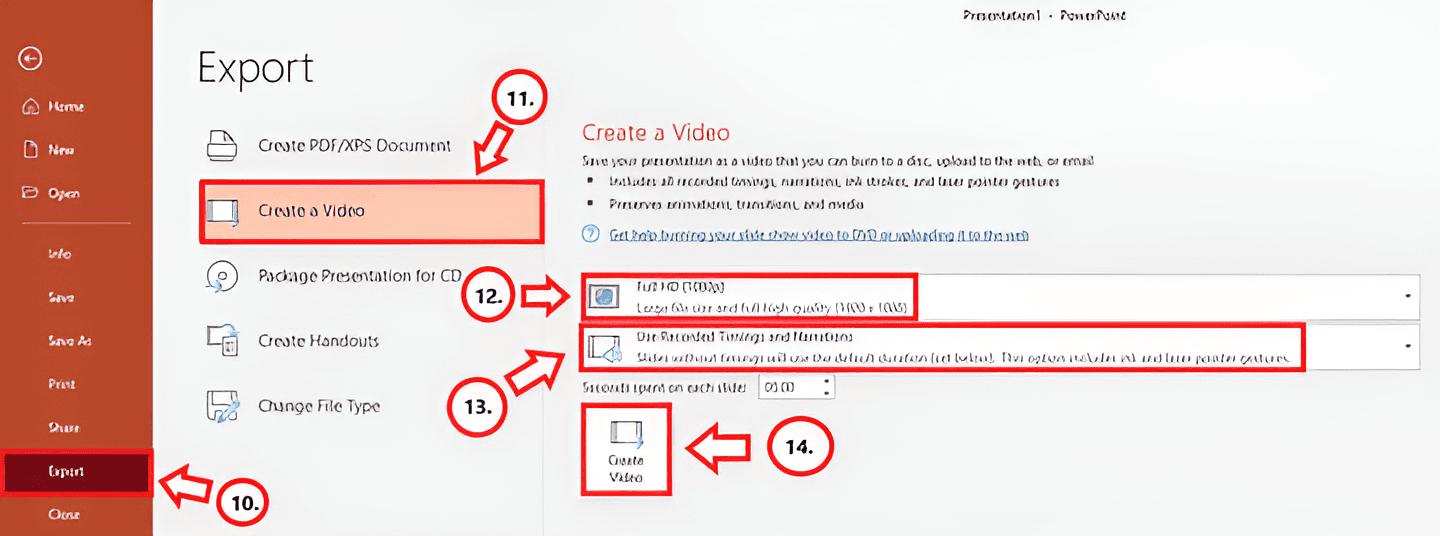
Once you're satisfied with your recording, save and share your presentation as either a PowerPoint file or a video:
Click on File and select an option like Save or Export.
Follow the on-screen instructions to save or export your presentation.
Now your voice-over presentation is ready for your audience. They'll be able to view and listen to your narration as they go through the slides.
We hope this step-by-step guide helps you create a polished PowerPoint presentation with a voice-over. Good luck, and happy presenting!
Record with OBS

For added flexibility and features, you may want to swing by other recording software.
For instance, OBS Studio offers a good deal of control, allowing you to tweak all sorts of audio and visual settings. However, it may be a little complicated if you're new to the game. Here are the steps to do this.
Step 1: Install OBS Studio
If you haven't already, first download and install OBS Studio from the official website. The software is available for Windows, macOS, and Linux.
Step 2: Open OBS Studio
Open OBS Studio. You'll see a black screen; this is your canvas where you'll be recording your content.
Step 3: Setting Up Your Scene
Click the '+' button under 'Scenes', name your new scene. This allows you to create different recording settings for different types of needs.
Step 4: Setting Up Sources
Underneath 'Sources', click the '+' button. This allows you to add different sources to your scene. You'll want to add two sources:
Display Capture: This captures your entire screen. Name the source, click OK, then OK again.
Audio Input Capture: This captures your microphone. Again, name the source, select your microphone from the dropdown, and hit OK.
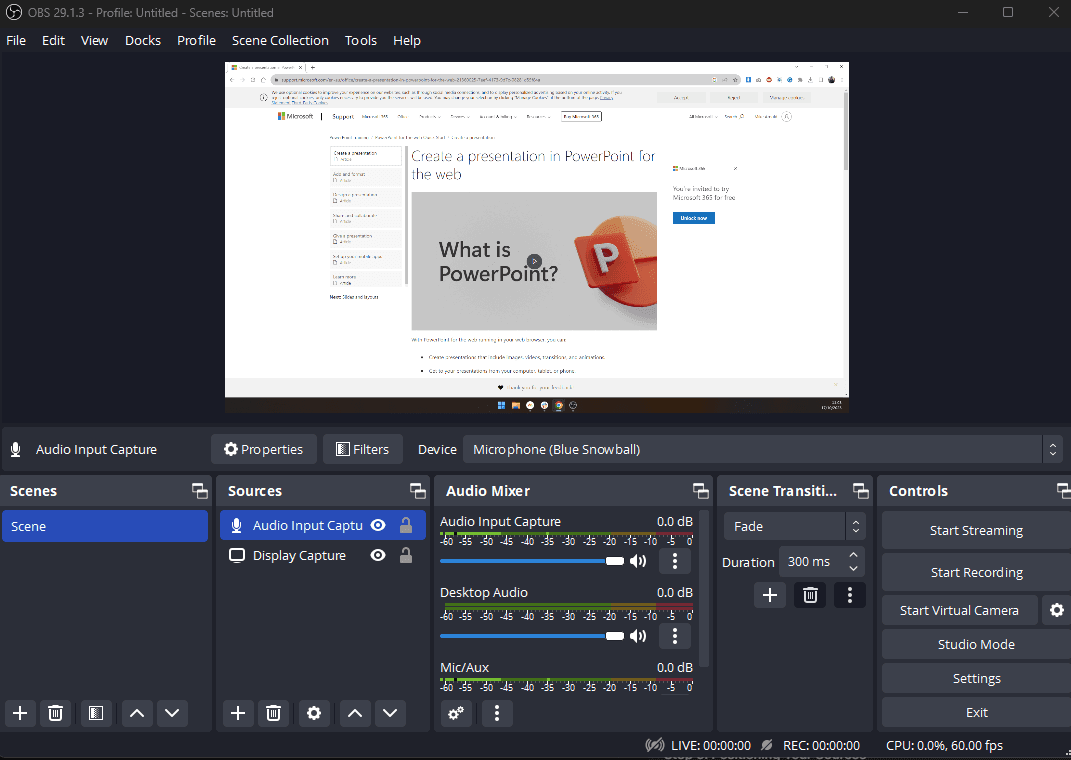
Step 5: Positioning Your Sources
You may see the 'Display Capture' source covering up everything. Click on 'Display Capture' source and drag it down the list until it's under your 'Audio Input Capture'. This ensures your voice is picked up over your presentation.
Step 6: Open PowerPoint Presentation
Open your PowerPoint presentation but don't start the slide show yet.
Step 7: Adjust OBS Studio Settings
Go back to OBS. Make sure your Display source is selected, then hover over the canvas. A red border will appear around your display source. You can resize and reposition this to only capture the portion of your screen that your PowerPoint presentation will take up.
Step 8: Start Your Presentation
In PowerPoint, start your slide show. OBS should now be capturing your presentation. Any slides you progress through in PowerPoint will be captured by OBS.
Step 9: Start Recording

When you're ready to start your presentation, go back to OBS Studio and click on the 'Start Recording' button located in the lower right. Once you hit this button, everything captured in OBS is recorded until you hit 'Stop Recording.'
Step 10: Save Your Recording
Once you've finished your presentation, click 'Stop Recording'. Your video is automatically saved in a specific location. To find where your recordings are saved, go to the 'File' > 'Show Recordings' in OBS.
And that's it! Now you know how to use OBS Studio to record a PowerPoint Presentation and voiceover using a microphone.
If you're looking for something simpler, ScreenPal (formerly Screencast-O-Matic) is a great choice. It's ideal for getting the job done without any distractions. However, you get less control over your content and the final product. OBS has a few other contenders, including Streamlabs. Check it out if OBS doesn't do it for you.
Comparatively, this software fares well with a broader set of controls than PowerPoint. However, they might demand a steeper learning curve, so brace yourself for a bit of a climb.
Record with Tella
Now you're all prepped and cozy with your goals, spruced-up presentation, and audio equipment, it's time to step into the recording booth.
And folks, today, we'll spotlight this cool little tool called Tella. It's like your Swiss army knife for screen recording, fully equipped to integrate smoothly with PowerPoint, too.
Talk about a dream team!
Step #1 - Getting started with Tella

Alright, first things first. We've got to get Tella onto your computer.
There are several ways you can do this, including;
Running the Web App
Running the Chrome extension
Running the Mac App
Simply download or log into the one you want to use. It's as easy as pie.
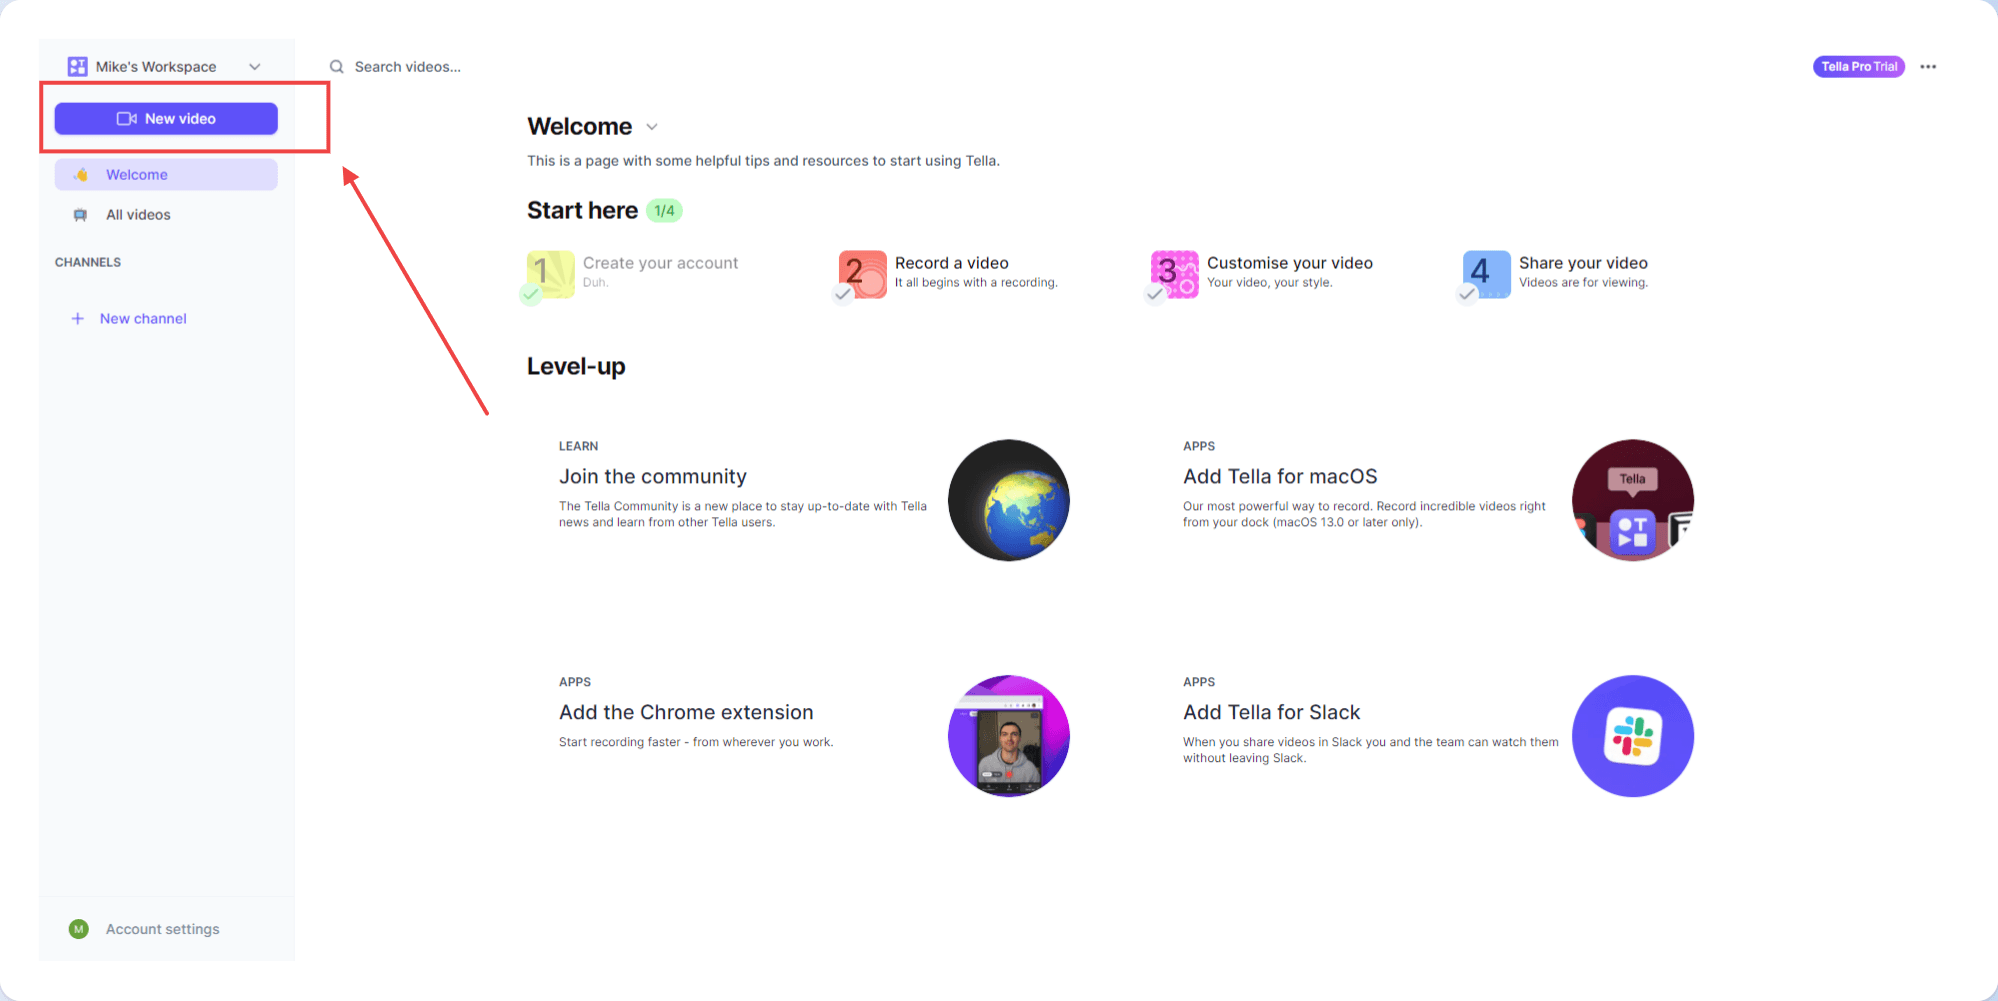
Once you've installed Tella through the app, run it, and you'll see a slick little control bar that'll be your best friend throughout this process. If you're working through the web app, just click "New Video" to get started in your browser. Don't worry, you can still screen record through the web app.
Have your presentation ready already?
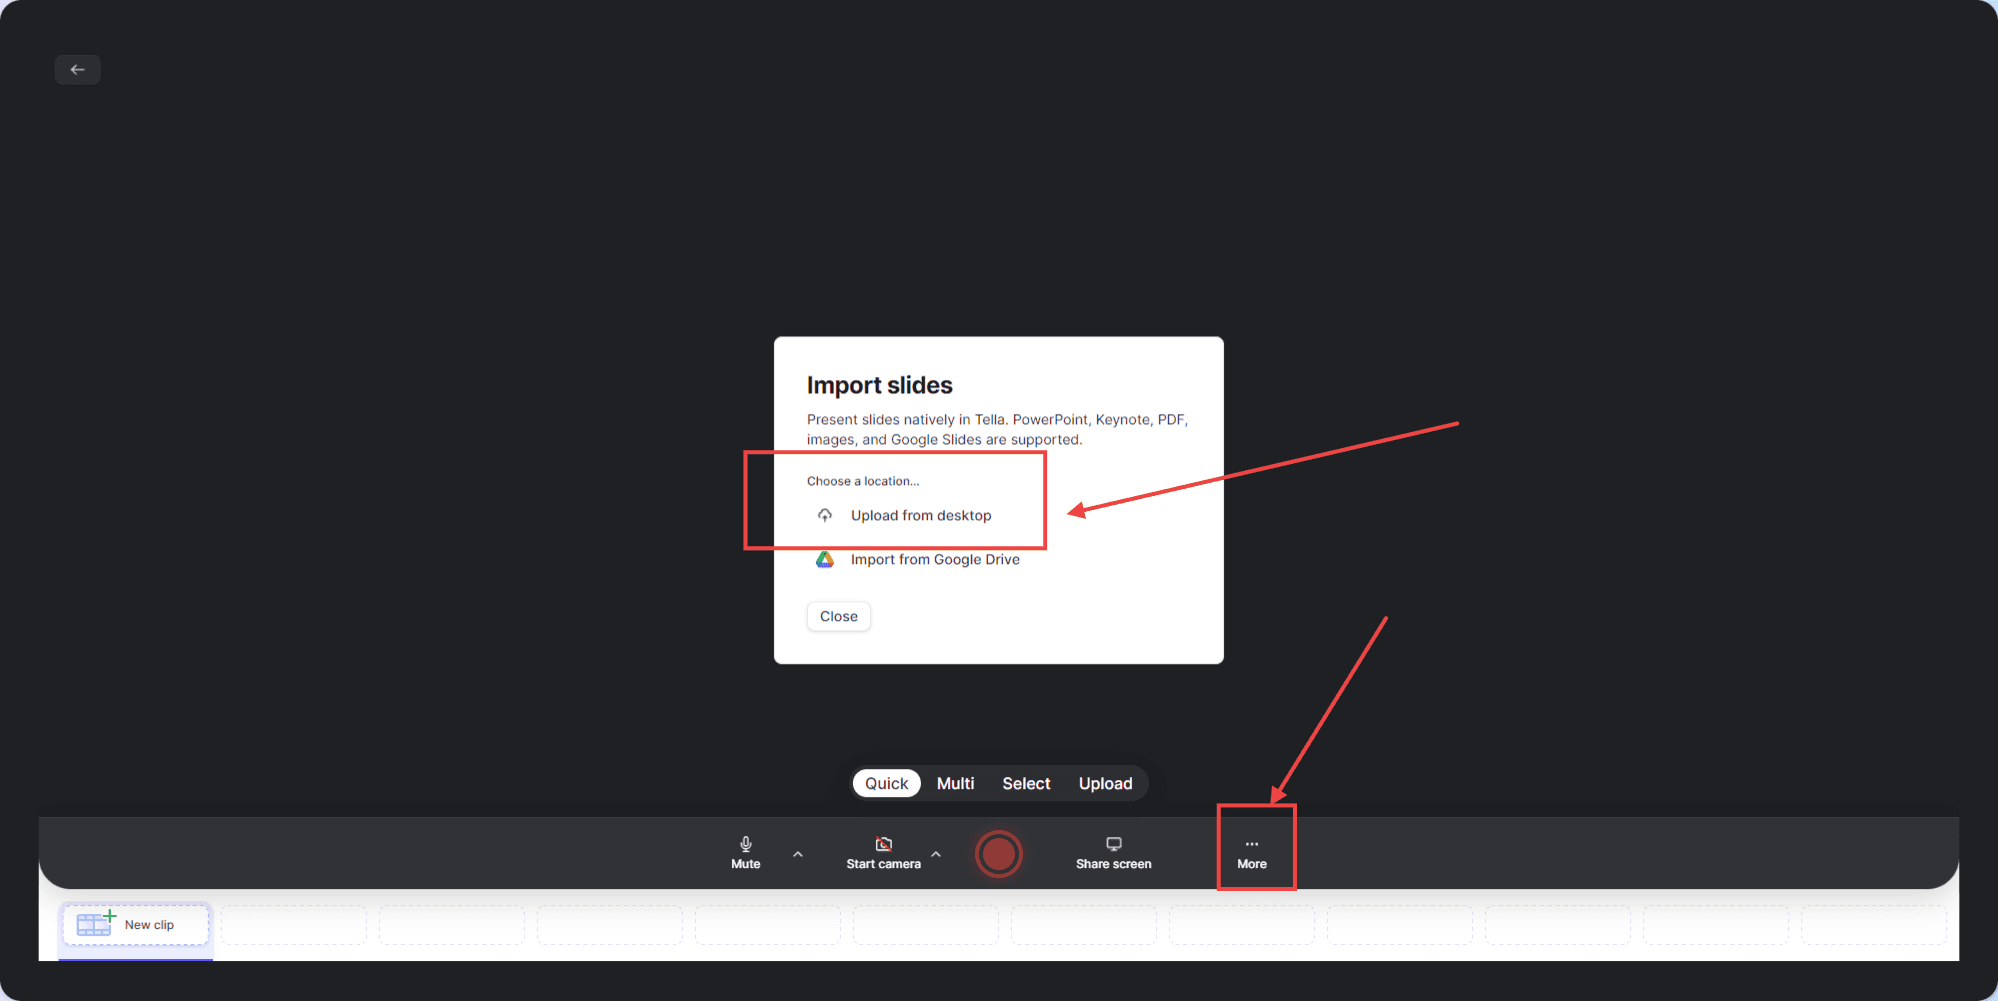
You can actually upload the presentation to Tella and run the PowerPoint through the app. Just click the "New Video" option, More, and then import your slides. All major presentation formats are compatible!
Now, we've got a couple of settings to tweak.
Click on the mic icon to configure your audio input settings. Make sure it's capturing the right microphone (yes, the one we picked out earlier). Next up, choose your recording area.
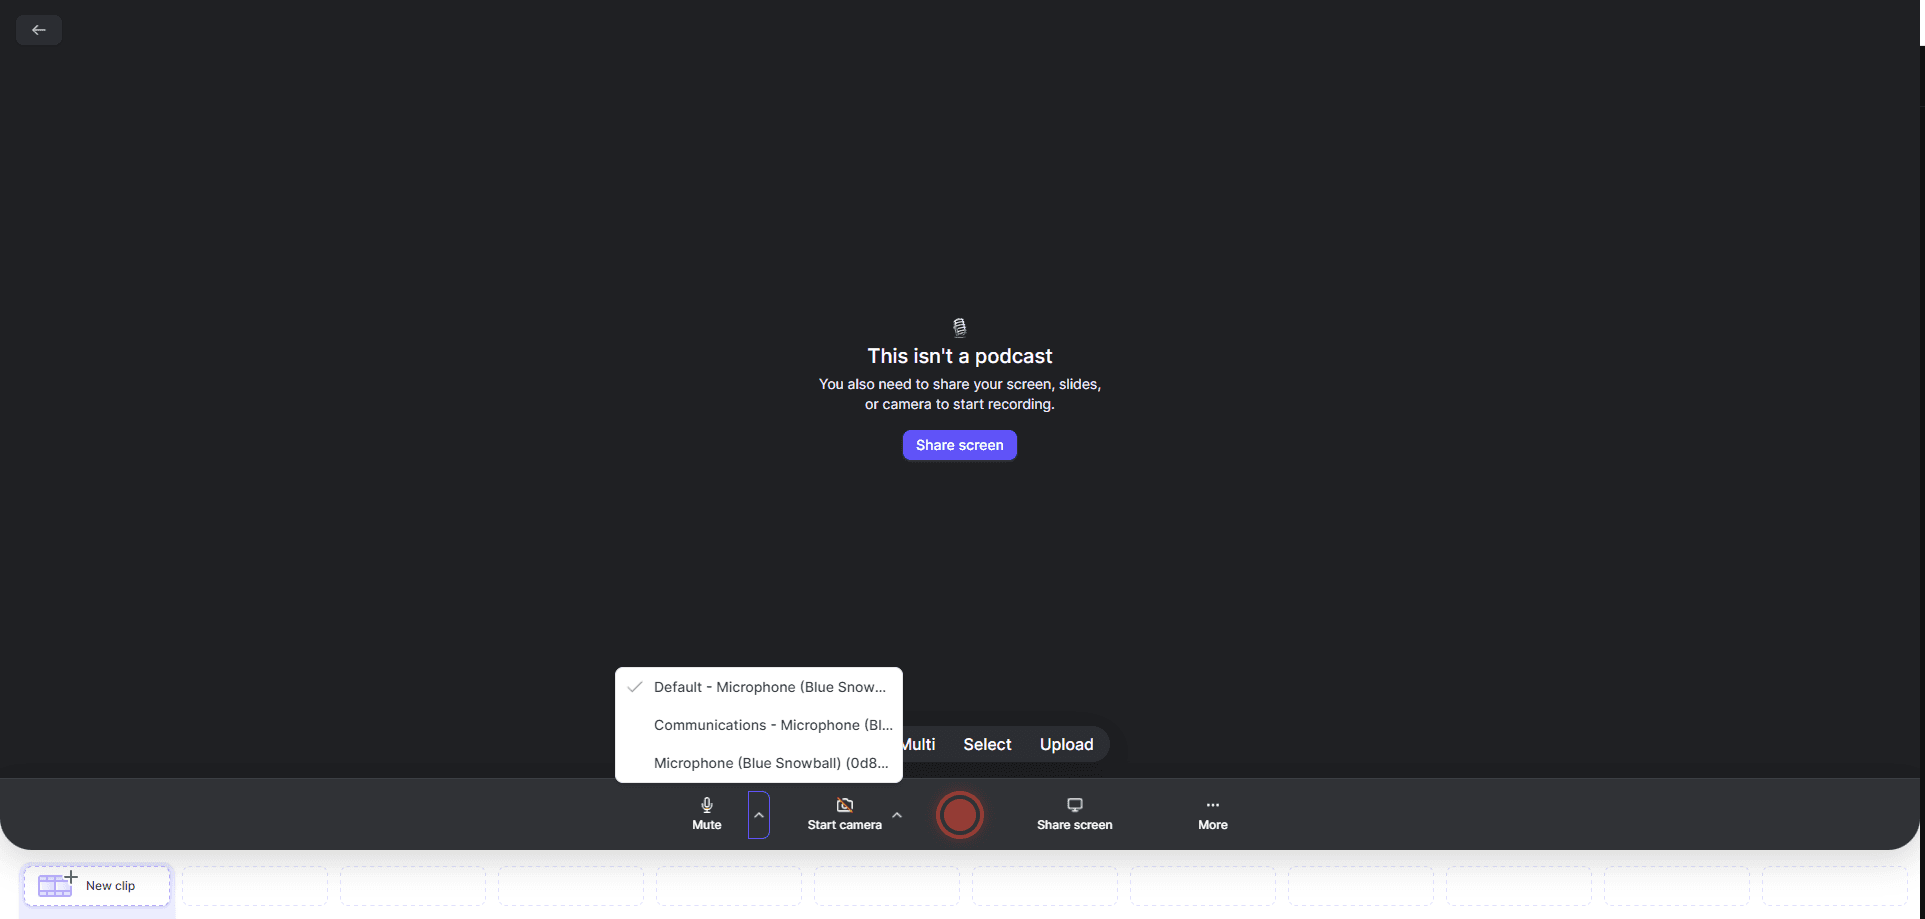
You'll want to adjust the recording frame to fit your PowerPoint presentation just right—think of it like framing the perfect picture!
Step #2 - Roll cameras, action!
Start recording your PowerPoint by hitting the red button. As you present, Tella will record your voice and slides.
You can pause, restart, or stop anytime using the controls. If you go off-topic, pause and restart.
When moving between slides, adjust your voice volume to match the mood. Keep a smooth rhythm, and your audience will follow along.
Step #3 - Wrapping it up
Breathe out; you made it!
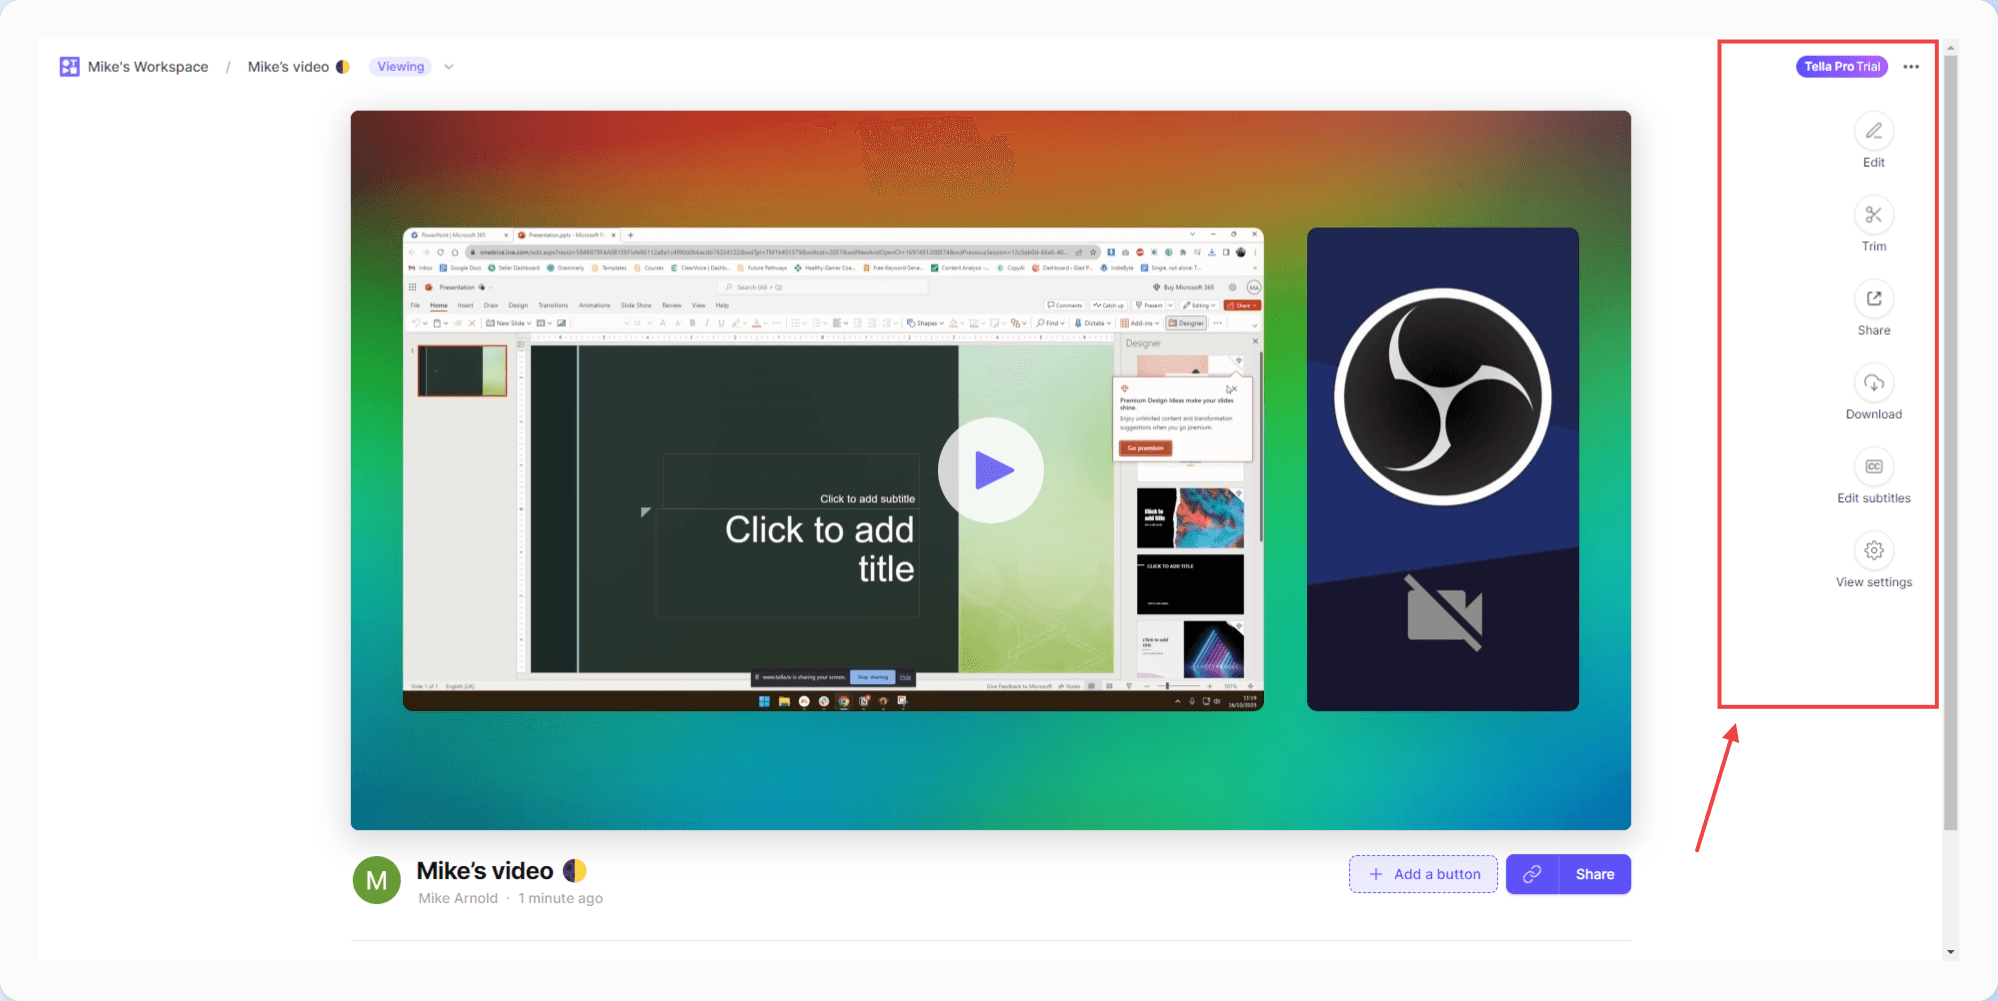
But before we call it a day, let's give our recording a quick polish. Click on 'stop' when you're done, and Tella will save your recording.
Now, fire up Tella's editing tools and trim any unnecessary bits—like when you knocked over your coffee mid-slide (we've all been there!). You can also add captions, effects, and basically anything you need to bring your presentation to life.
Aaand cut! With your shiny new feed of your PowerPoint presentation, you're all set to captivate your audience, one slide at a time. Isn't Tella just swell?
Other solutions to record a PowerPoint
There's a whole parade of cloud-based tools like CloudApp (now Zight) or Loom that lets you record right from your browser! They store your recordings in the cloud, allowing you to access or share your work from anywhere.
If you're using Zight, a basic step-by-step guide would look like this:
Open Zight: Start up the Zight application on your device. Zight is available for Mac, Windows, and Chrome.
Prepare Your Presentation: Open your PowerPoint presentation that you wish to record. Make sure it's in view on your screen.
Capture & Record: In Zight, choose the 'Screen Recorder' feature to capture and record your screen. Make sure your entire PowerPoint window is in the capture area.
Voice-Over: As Zight records the screen, start your PowerPoint presentation and provide your voice-over. Ensure your device's microphone is on and working. Zight will record the PowerPoint and your voice simultaneously.
Edit & Annotate (Optional): If needed, make use of Zight's editing capabilities. You can trim segments of your recording, add text or highlight areas for emphasis.
Save & Share: Once you're satisfied with the recording, save the file. You can also share your recorded presentation directly from Zight through a generated link.
While easy, remember, even clouds have their gray days. With these tools, you rely on internet speeds to keep things running smoothly. Plus, you might stumble upon some limitations in editing features compared to our pals like Tella.
Things to do before you start recording

Before recording, you need to plan and set up. Envision your end product so you can make the right choices. This lays the groundwork for great content. This plan includes;
Setting your goals
Know the purpose of your presentation. This gives it clear direction, like finding your true north.
The purpose could be educating, convincing, or rapport building. Align it with your company or personal goals.
Once you know the purpose, you're halfway there.
Creating content to fit your audience
Tailor your content to your audience. Understand their backgrounds, needs, and preferences.
Align your content accordingly. Use familiar examples and anecdotes to create a personal, engaging experience.
Let your audience know you speak their language.
Polishing your presentation

Use good design - neat layouts, color schemes, legible fonts. Make it visually appealing.
Add informative visuals like diagrams, charts, and images to convey information effectively.
Sprinkle in interactivity - polls, links, videos. This engages your audience.
Review every slide carefully to fix any errors. Consistency is key.
Polish your presentation to make it the best it can be. This will engage your audience and get your message across clearly.
Prepare your audio equipment

Pick a good microphone for clear audio. A USB mic is simple. A condenser mic offers high quality. A lapel mic leaves your hands free.
Tune your audio settings for the best sound quality. Monitor your audio live to avoid background noise.
With your microphone and settings ready, you're set to start recording high-quality audio.
Tips for creating engaging PowerPoint recordings

Creating an engaging PowerPoint presentation takes skill. Follow these tips to boost engagement:
Speak clearly and expressively. Your voice guides the audience, so use a friendly, steady tone.
Use visuals. Graphics, charts, and animations complement narration. Strike a balance between visuals and audio.
Provide resources. Include downloads, links, or CTAs to encourage interaction after the presentation.
Edit thoroughly. Refine audio levels and flow. Even basic video editing goes a long way in delivering a seamless presentation.
With these techniques, you can create compelling presentations that captivate your audience.
Wrapping up
We've covered every tool to record PowerPoint presentations with audio. Tella stands out for its easy interface, audio settings, and editing tools. It works seamlessly with PowerPoint, too. But the tool is only part of the equation.
You must also speak clearly, use visuals, provide resources, and edit your recording.
Whether making webinars, tutorials, or virtual classes, you've got this.
Are you ready to record your next award-winning PowerPoint?
Try Tella for your recording needs. Let your ideas take flight. Use Tella to captivate your audience, one slide at a time. Create presentations that engage, excite, and inspire.
Happy recording! Go make memorable presentations that resonate with audiences.