November 15, 2023
How to Record a Zoom Meeting

Mike
Zoom has become an indispensable tool in our everyday communication. In this post, we guide you through the step-by-step process of recording Zoom meetings, ensuring you never miss important details.
Table of contents
Record a Zoom call (host)
Record a Zoom call (guest, recording allowed)
Record a Zoom call (guest, recording not allowed)
Alternative: Record a Zoom call with OBS
Get the transcript of a Zoom Call
Alternative transcript option
Record the audio of each person in a Zoom call
Record a Zoom call as the host
First, how to record your Zoom call while hosting the call. Whether you're running a seminar, having a chat with a client, or undertaking a workshop, recording your Zoom call can be a great way to have the content to watch over or make more content with.
Both video and audio content will be recorded and saved as an MP4 file. Audio only is saved as a M4A. Here's what you need to do to start the recording process.
Start Your Meeting: Initiate the Zoom meeting as the host.
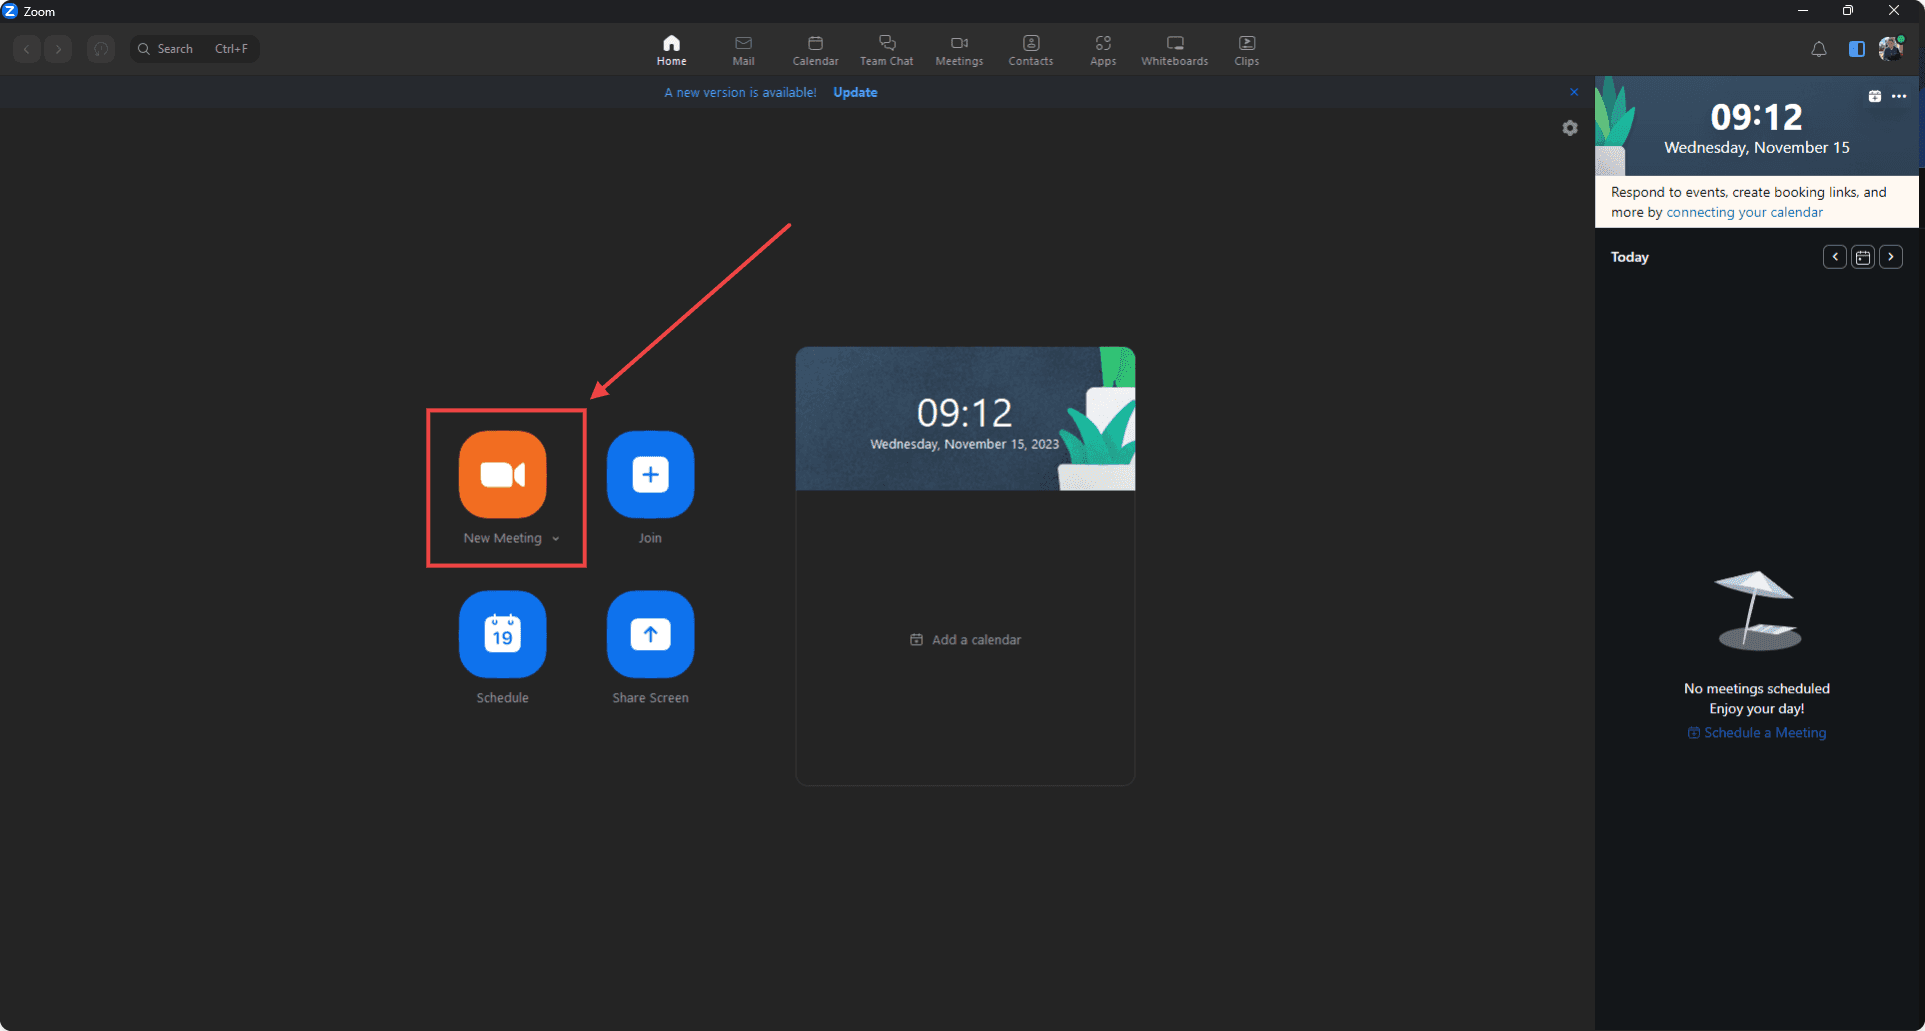
Access the Menu: Look towards the bottom of the Zoom window. You'll find a menu. If it isn't visible, move your cursor within the Zoom window to bring it up.
Start Recording: On this menu, you'll find the "Record" option. Click on it to start recording your meeting. You'll see a recording indicator in the top-left corner of the meeting.
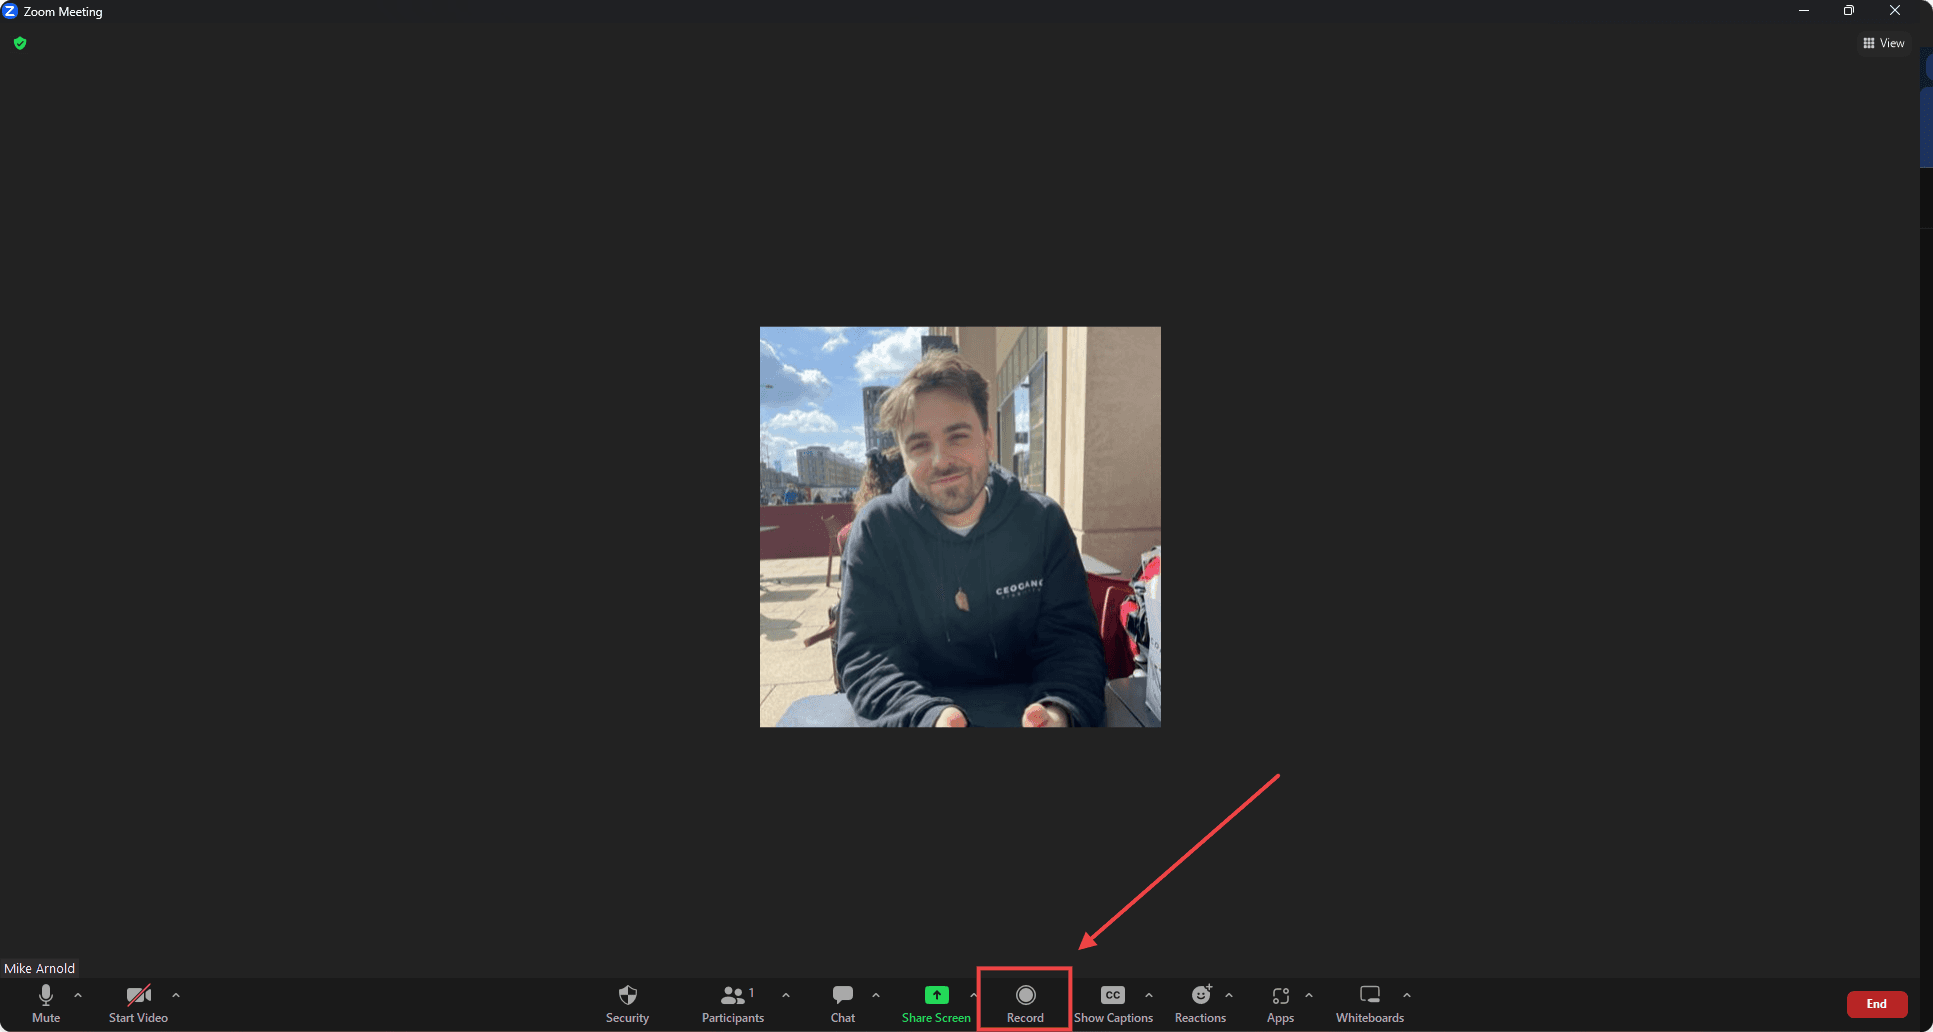
Pause or Stop: On the same menu, the "Record" button now provides options to pause or stop the recording. Use them as per your requirements.
End Your Meeting: Once your meeting is over, just end it as usual.
Retrieve Recording: Zoom will then convert the meeting recording into a file format accessible by most media players. The recording file will be stored in the default Zoom folder, usually in the "Documents" section on your computer.
To find the recorded file location with ease, open the Settings menu in Zoom.
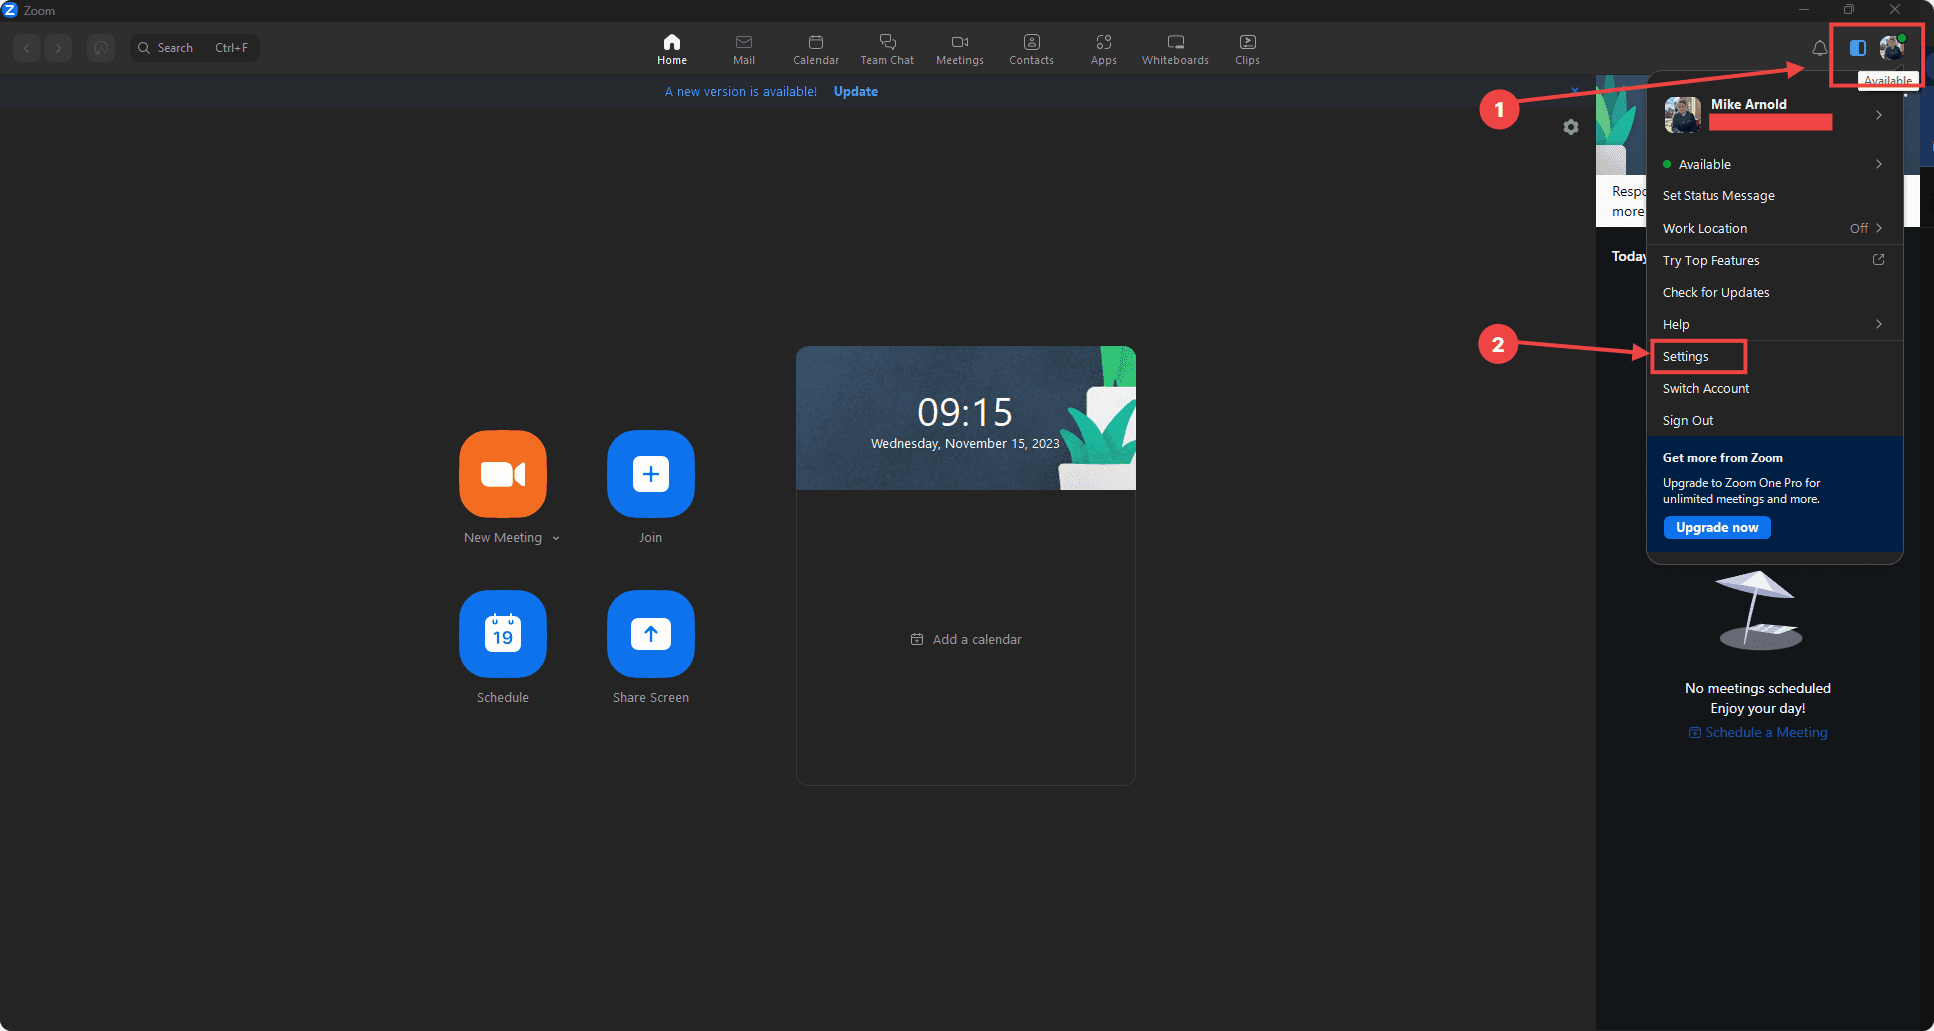
Then, navigate to the recording page and see where the Store My Recording At option is. To open the file location, click the "Open" button.
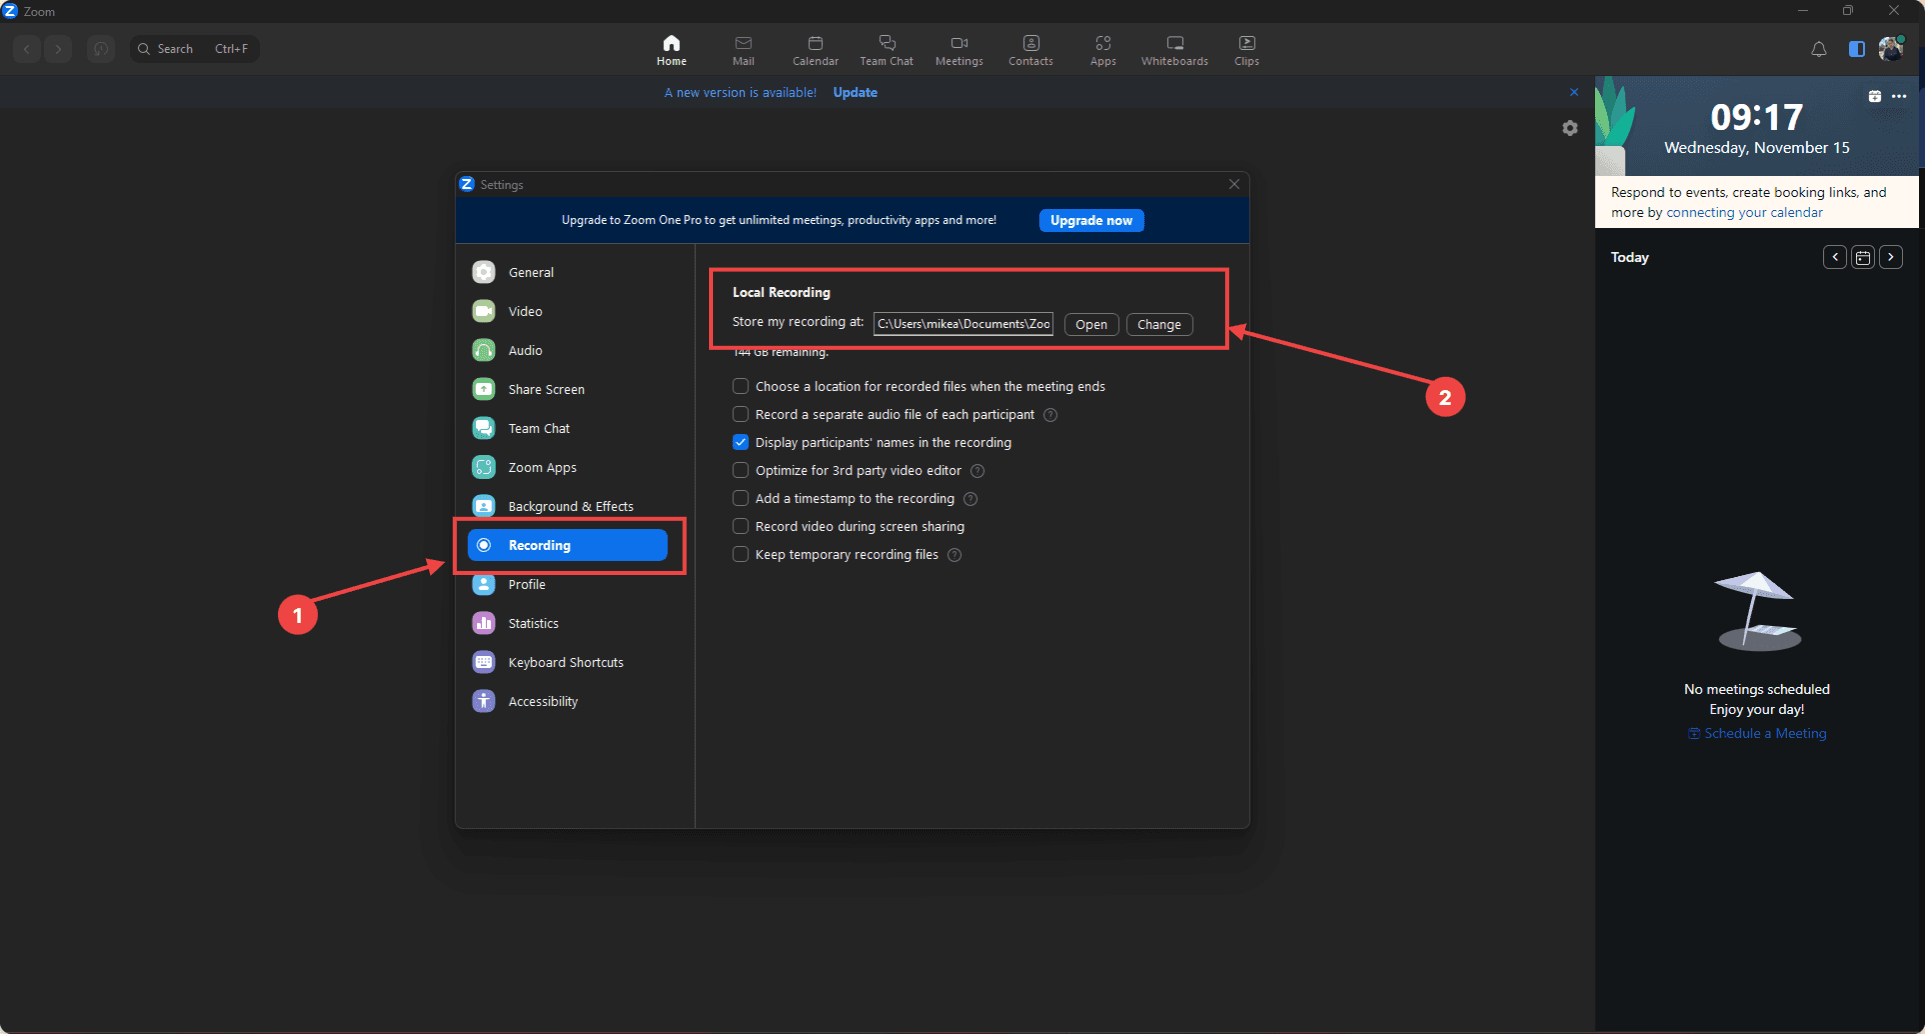
Remember, these instructions apply only to local recording (recording stored on your computer). For cloud recording, different processes apply. Also, note that the host needs Zoom's desktop client for recording.
Record a Zoom call as a guest (recording allowed)
Looking to record a Zoom call you're attending as a guest?
There are several ways to do this, as it may not be as simple as recording as the host.
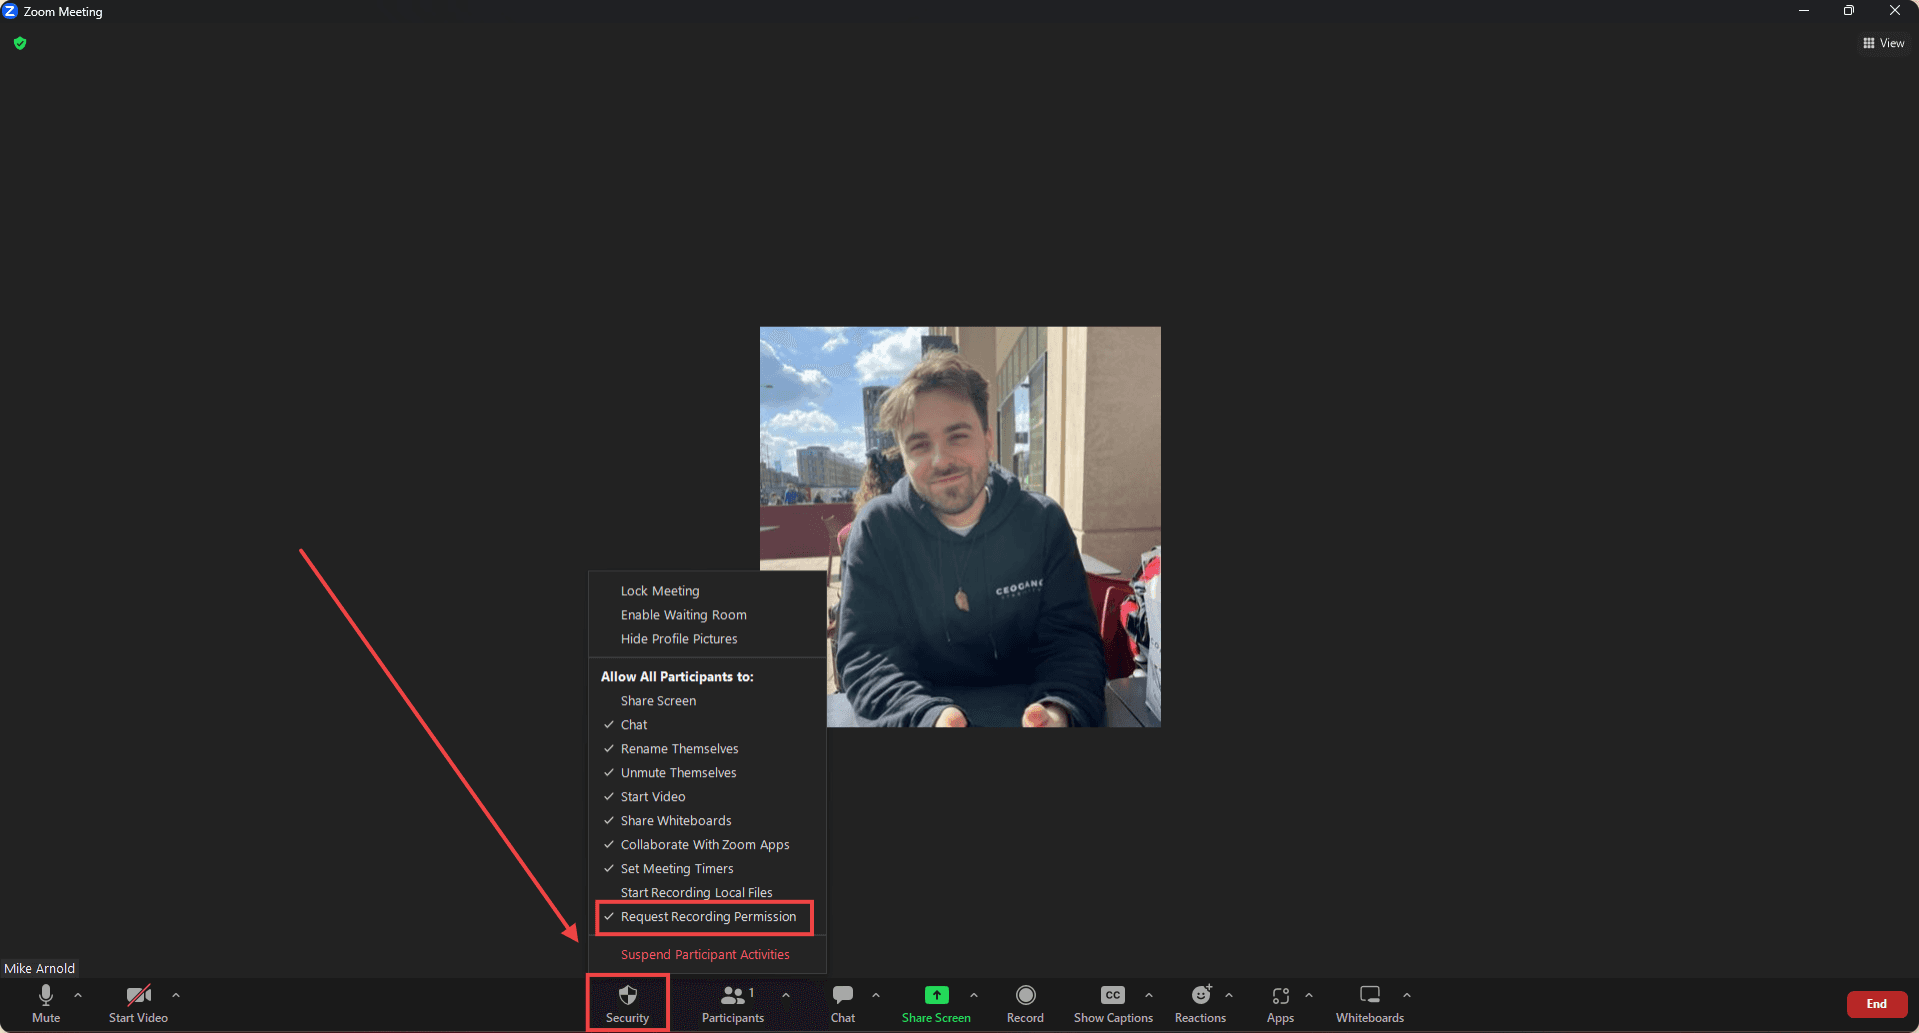
To record the official way, using Zoom's built-in recording features, you'll need permission from the host.
They can grant this by clicking on 'Security' -> 'Request Recording Permission' -> and then ensuring that the option is ticked.
Then, you simply record in the same way as the host would using the option at the bottom of the screen. Same as the method above. You can record both video and audio as before (in an MP4 format), or audio-only as an M4A.
If the host doesn’t permit recording, you can use Windows and Mac native screen recording features. Alternatively, you can use screen recording software like Open Broadcaster Software (OBS) to record the meeting.
Let's break these methods down.
Record a Zoom call as a guest (recording not allowed)
Record a Zoom call on Windows PC
If you're a guest in a Zoom meeting and want to record it but the host hasn't allowed it, you can use the built-in Xbox Game Bar in Windows 10. Here's how:
Prepare Your Screen: Close all windows on your desktop except the Zoom meeting you want to record.
Open Xbox Game Bar: Navigate to the Xbox Game Bar in the Start menu or use the shortcut, 'Windows logo key' + 'G'.

Start Recording: After the Game Bar app opens, click the 'Start Record' button or use the 'Windows logo key' + 'Alt' + 'R' shortcut.
Record Your Meeting: Conduct your meeting as usual. Meanwhile, the Xbox Game Bar will record the Zoom Meeting in the background, capturing the entire desktop view.
End Recording: When your meeting concludes, stop the recording. Click on the pop-up notification informing you that your recording has been saved, guiding you to its location.
This way, you can record Zoom meetings on your Windows 10 or 11 computer, even as a guest or without recording permissions.
Record a Zoom call on Mac
If you're looking to record a video from a Mac, then simply repeat the steps, but instead of using the Xbox game bar, use the Command + Shift + 5 shortcut to open the QuickTime screen recording functions.
Alternative: Record a Zoom call with OBS
If the methods above don't work, don't worry; there are still ways to record.
The most popular and easiest is using a screen recorder and broadcasting software known as OBS Studio. Here's how to get it to work. However, any kind of screen recording that records the video and the audio of a desktop window (the Zoom app) will work.
OBS can record in a variety of formats, including MP4, MOV, MKV, and TS. If you're recording audio only, you'll need to convert your recorded video into an audio format, like MP3. You can use an online tool like this for that process.
Here's what you need to do.
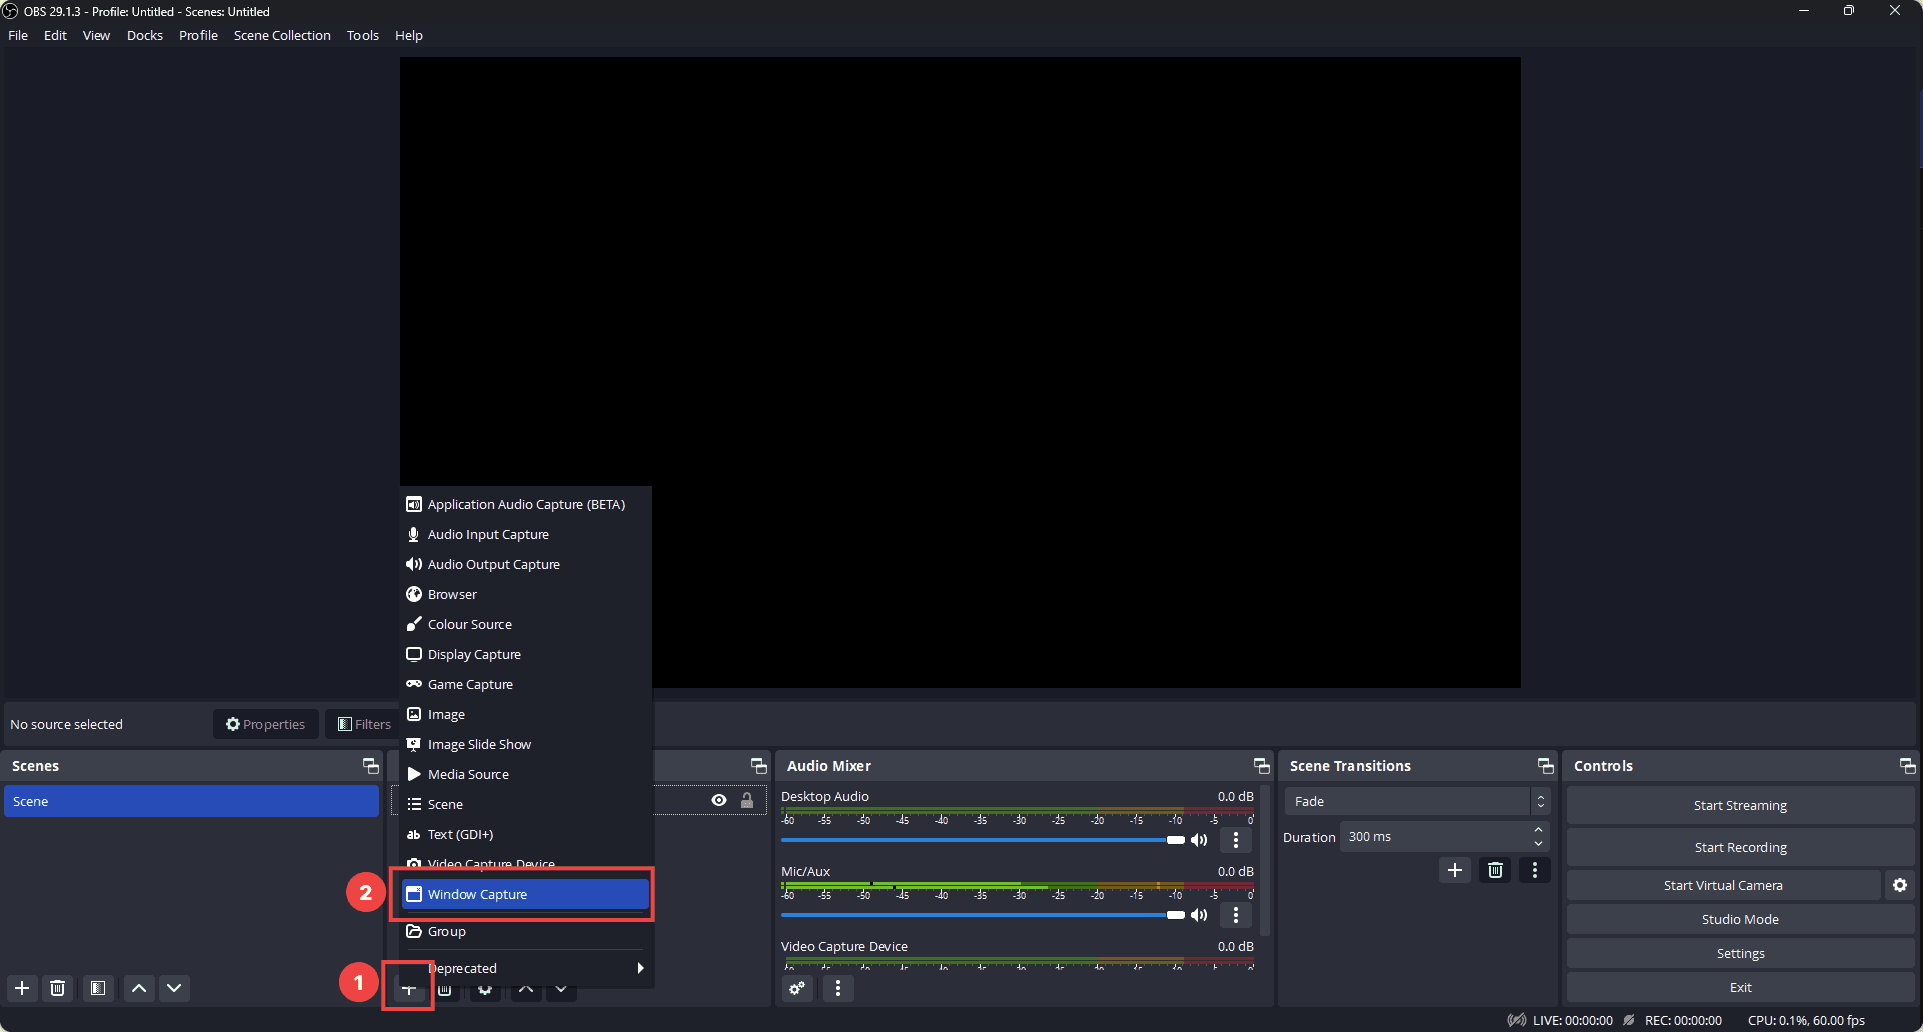
Install OBS Studio: Download OBS Studio and install it on your device.
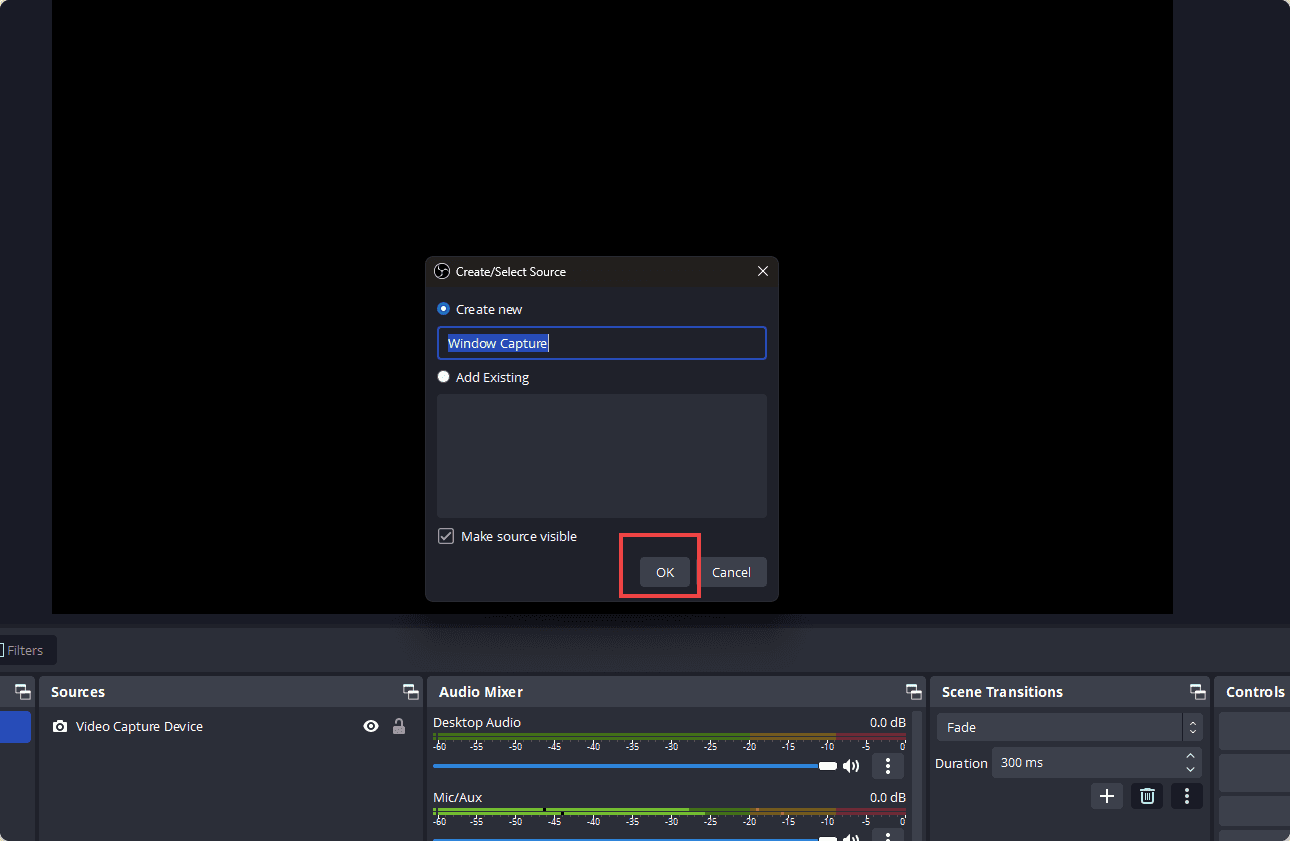
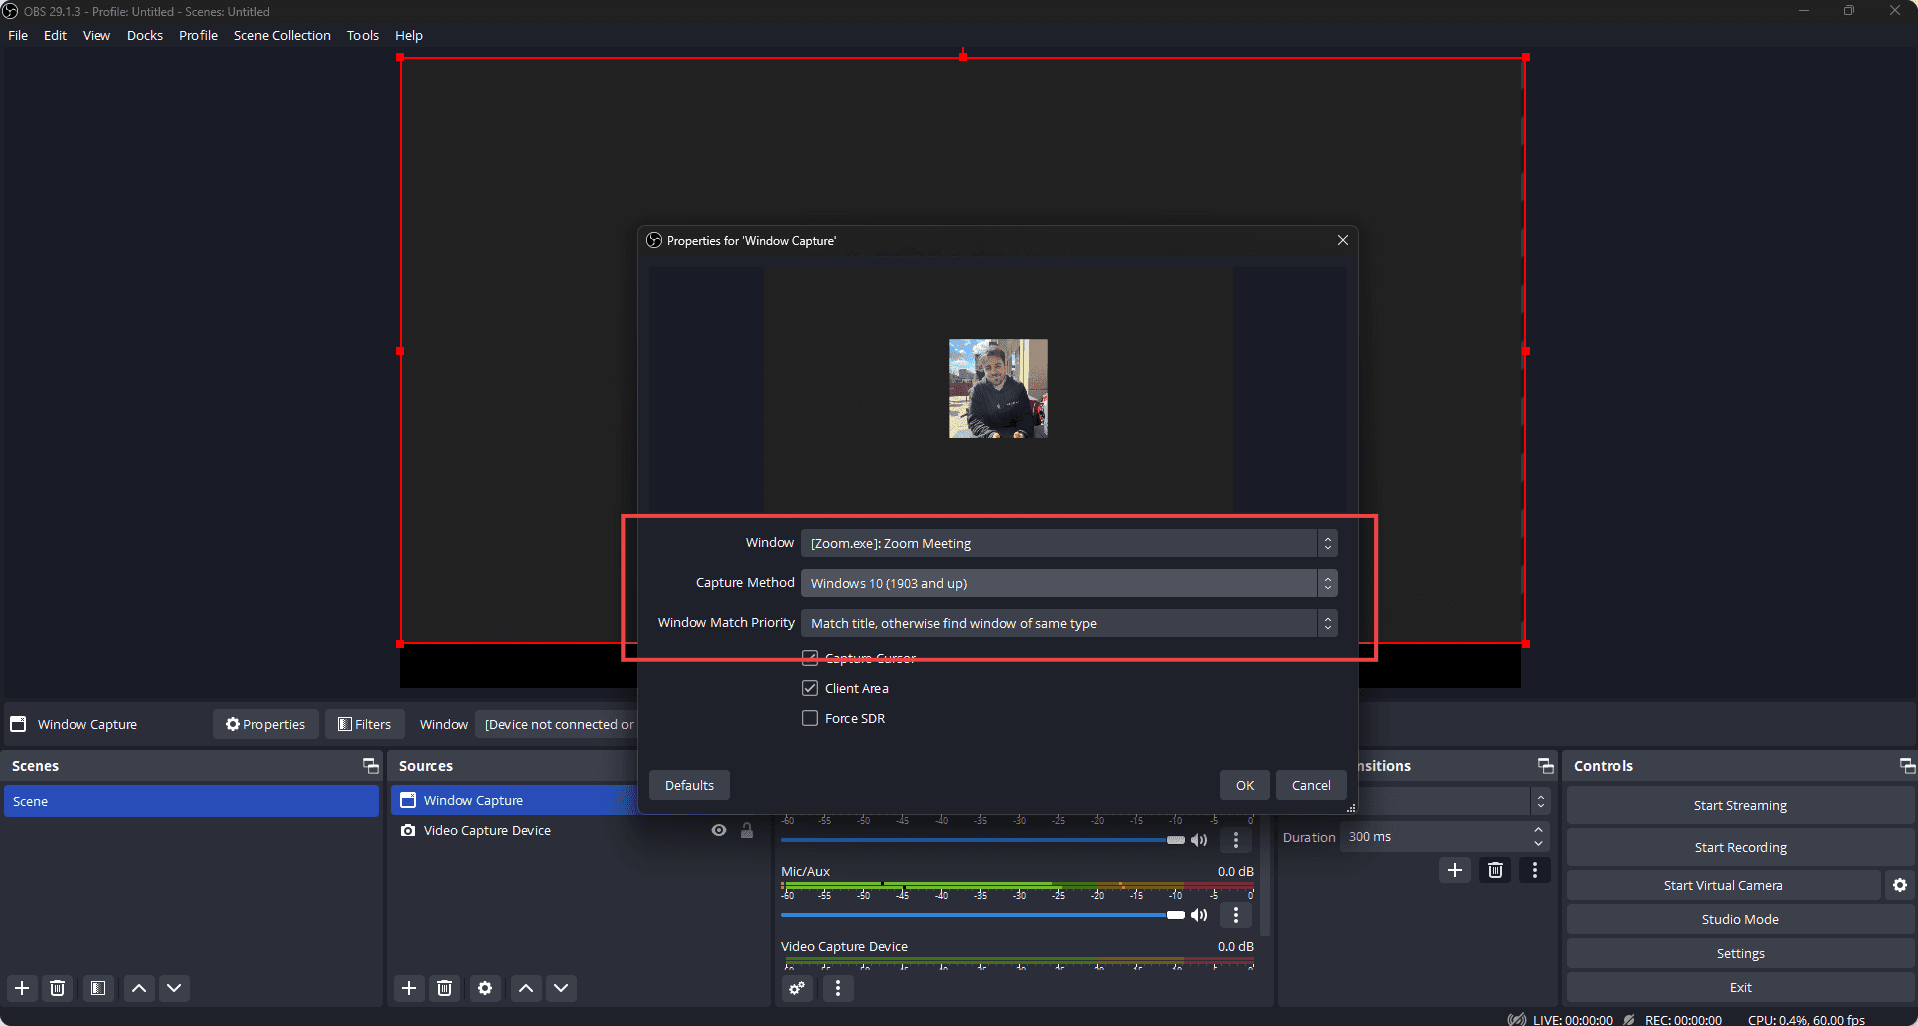
Set a New Source: Open OBS, click the '+' icon in the 'Sources' tab, and select 'Window Capture'. Specify what part of the screen you want to record.
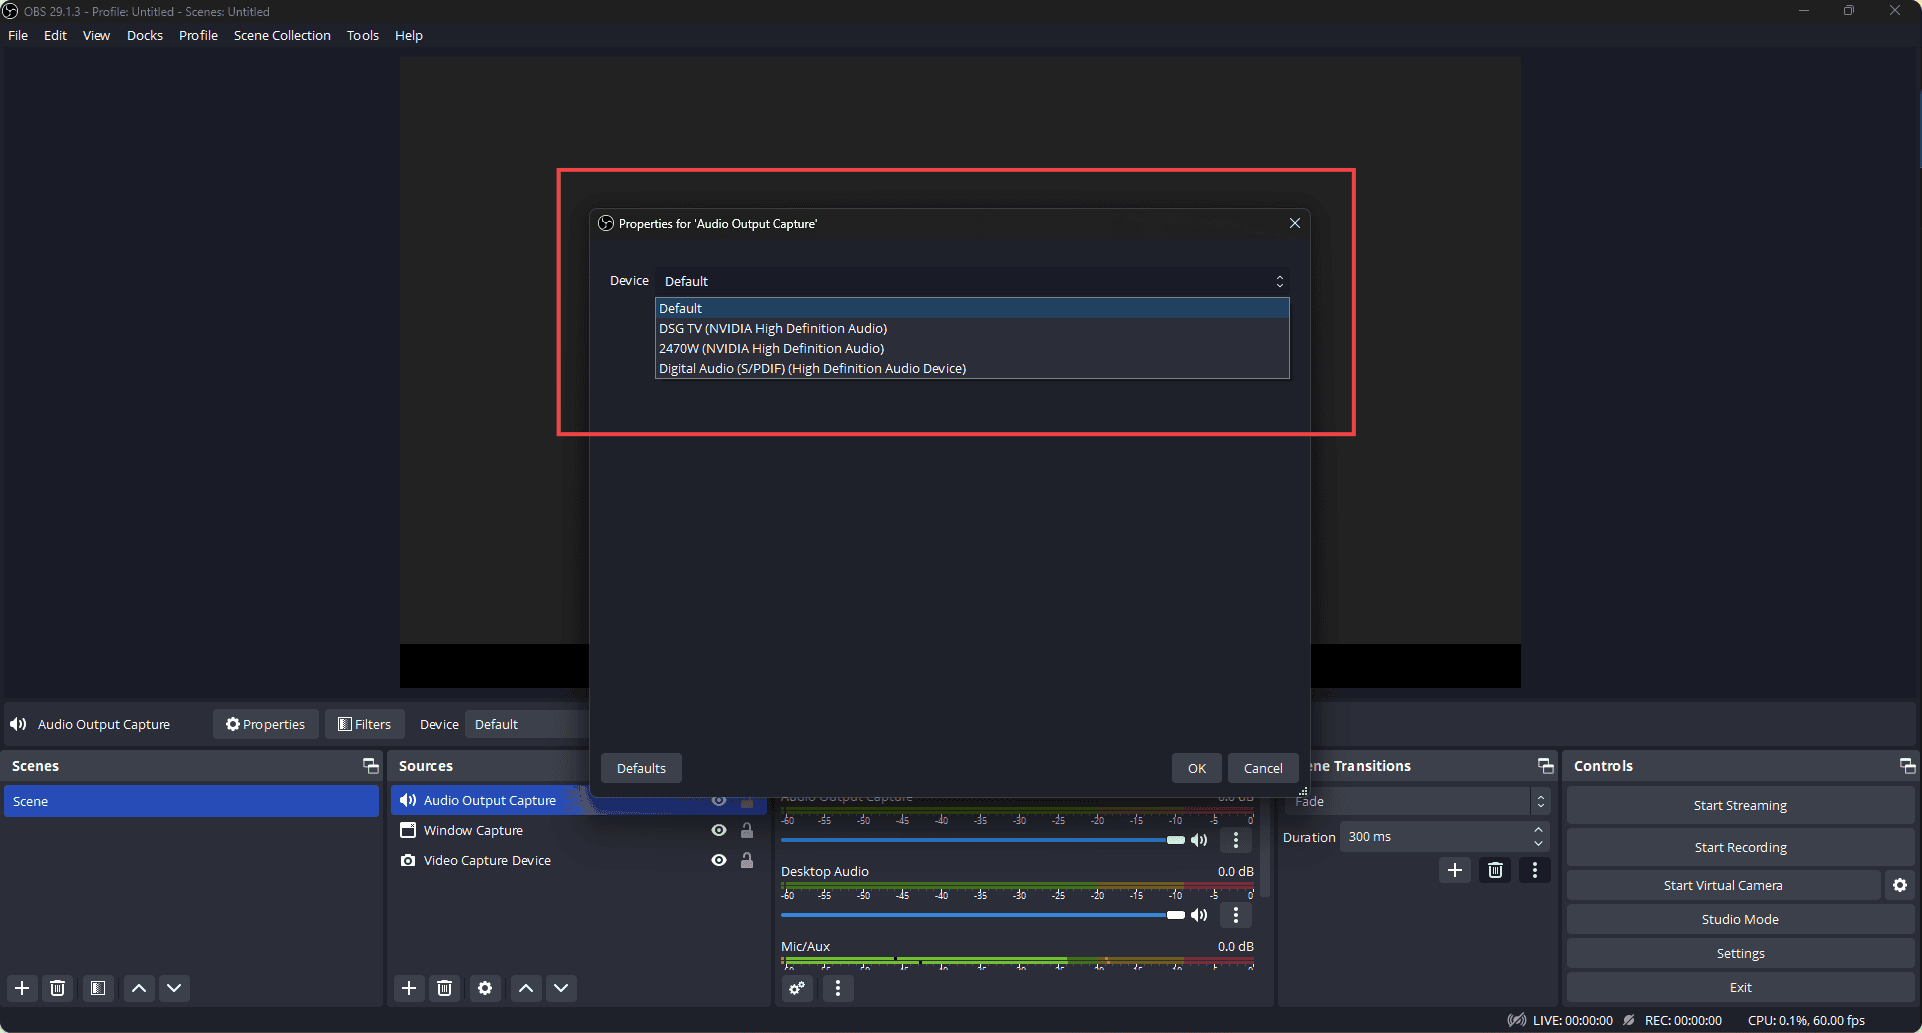
Configure Audio: Go back to 'Sources' -> '+' icon -> 'Audio Input Capture'. This adjusts the audio recording settings.
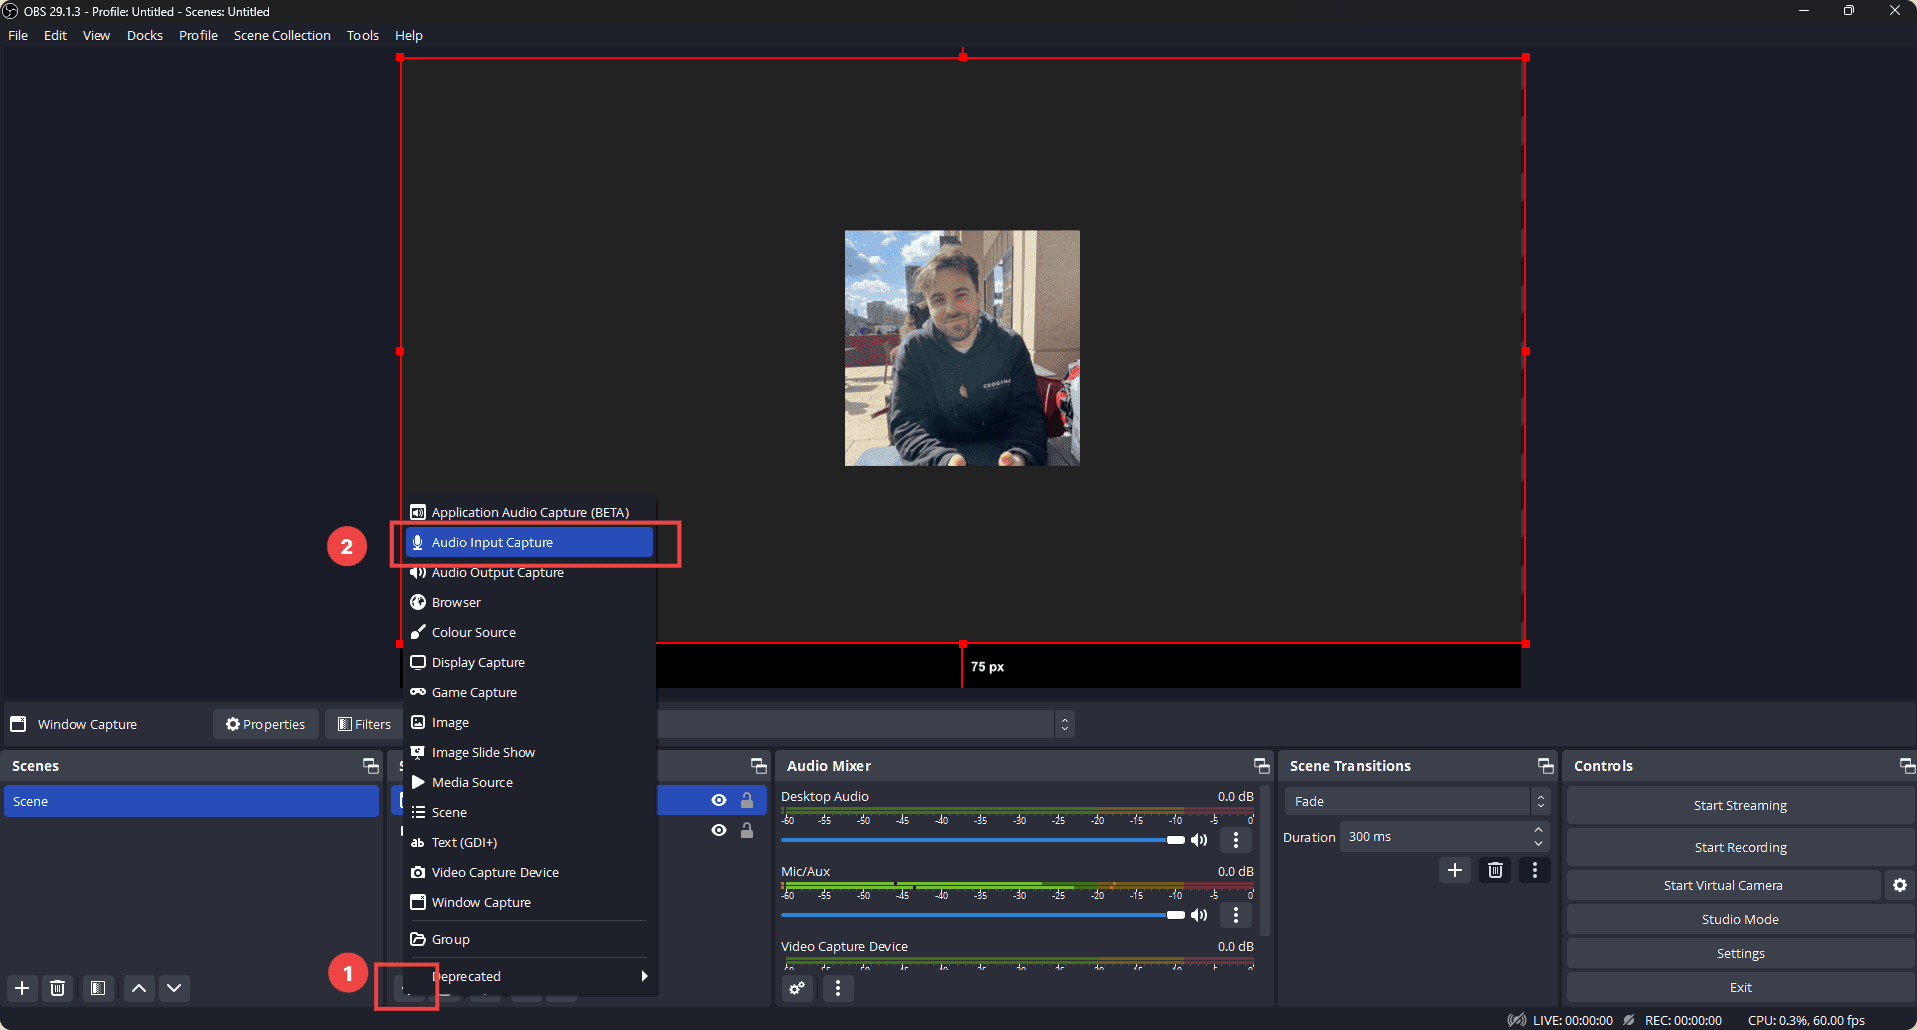
You'll need to select whichever device you usually listen to your sound out from, I.E. your headphone jack.
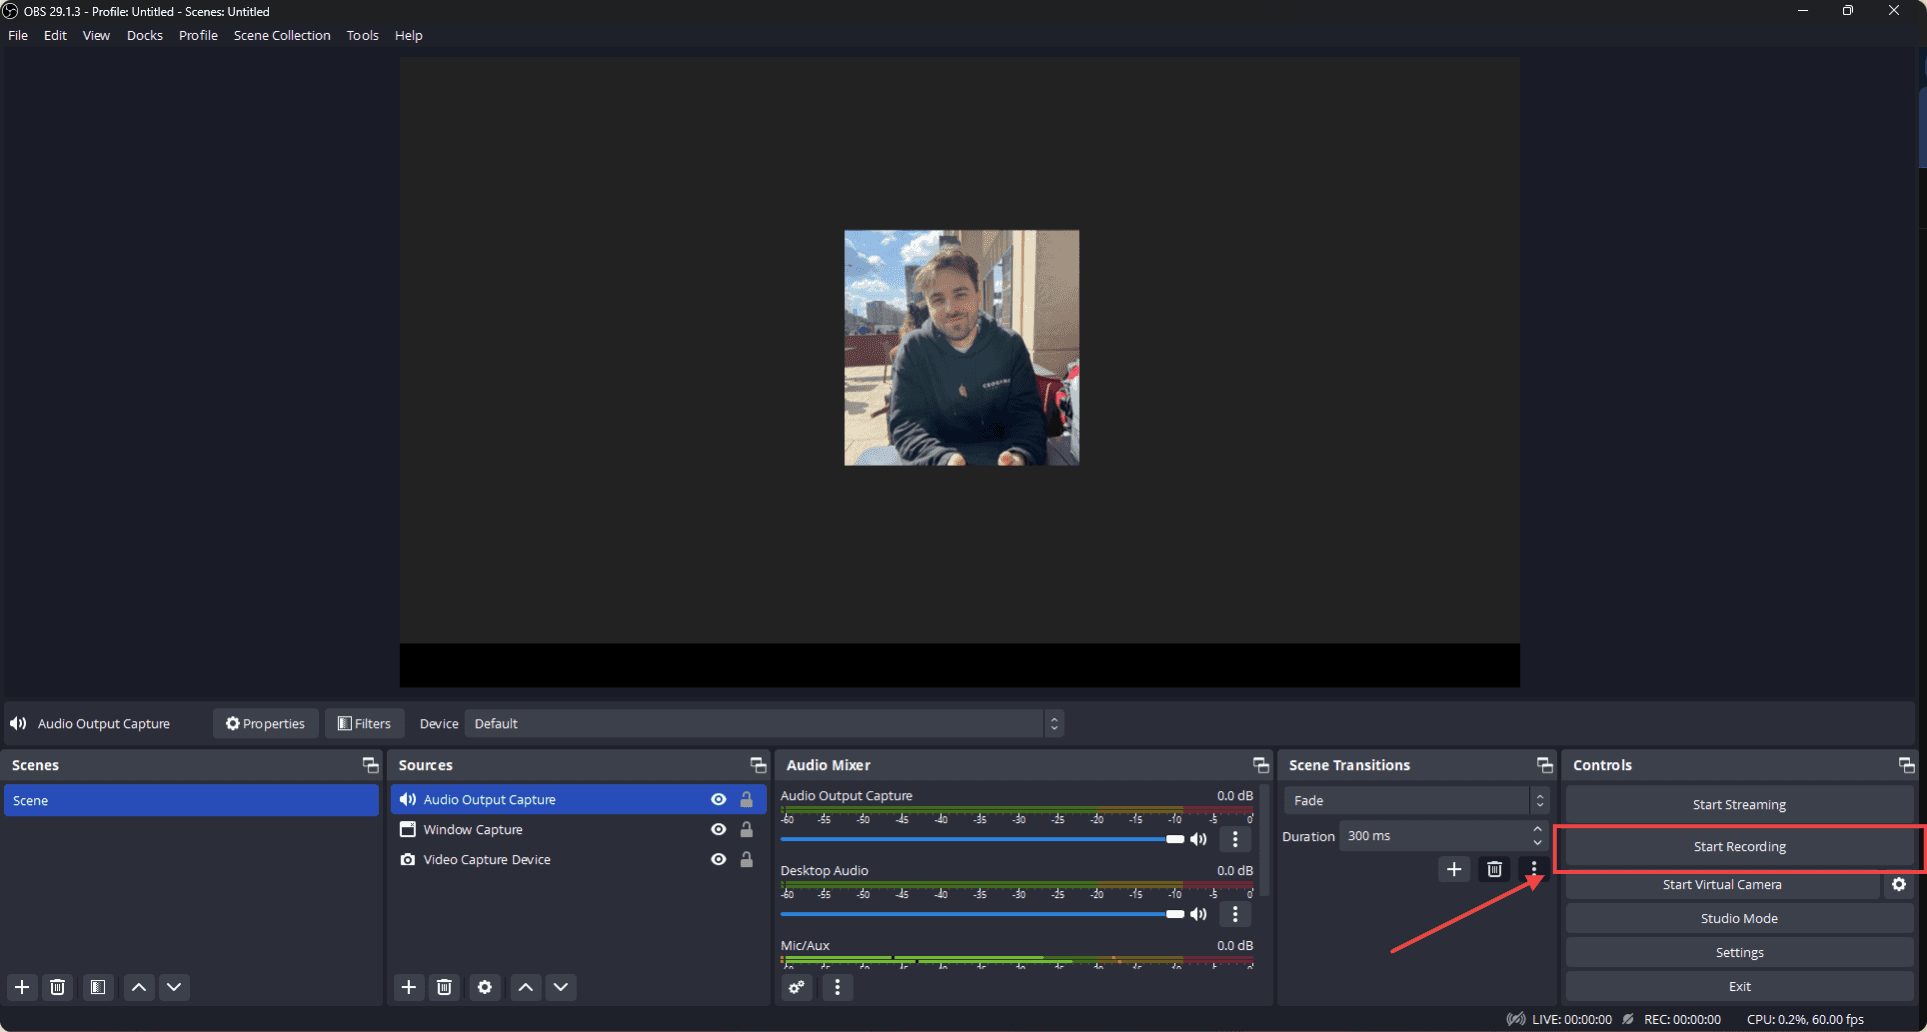
Start Recording: Click on 'Start Recording' in OBS when you're ready. Later, you can stop it by clicking 'Stop Recording.'
Remember, the use of OBS to record Zoom meetings should respect privacy laws and guidelines. Inform all participants that you’re recording if the host doesn't disclose it.
That's it. Please ensure that you have the necessary permissions and consents before recording a Zoom meeting! Using OBS is helpful when you don't have the option to record directly in Zoom.
Get the transcript of a Zoom Call
Want a transcript of your Zoom meetings? Find it easier to go through the text of a conversation, perhaps for reviewing notes or making a blog post with ease about your call? Here's a quick guide.
Note: You'll get the file in a TXT format.
Enable Transcription: In your Zoom settings, click on the recording tab. Enable 'Cloud Recording' and tick 'Audio Transcript.' Save changes.
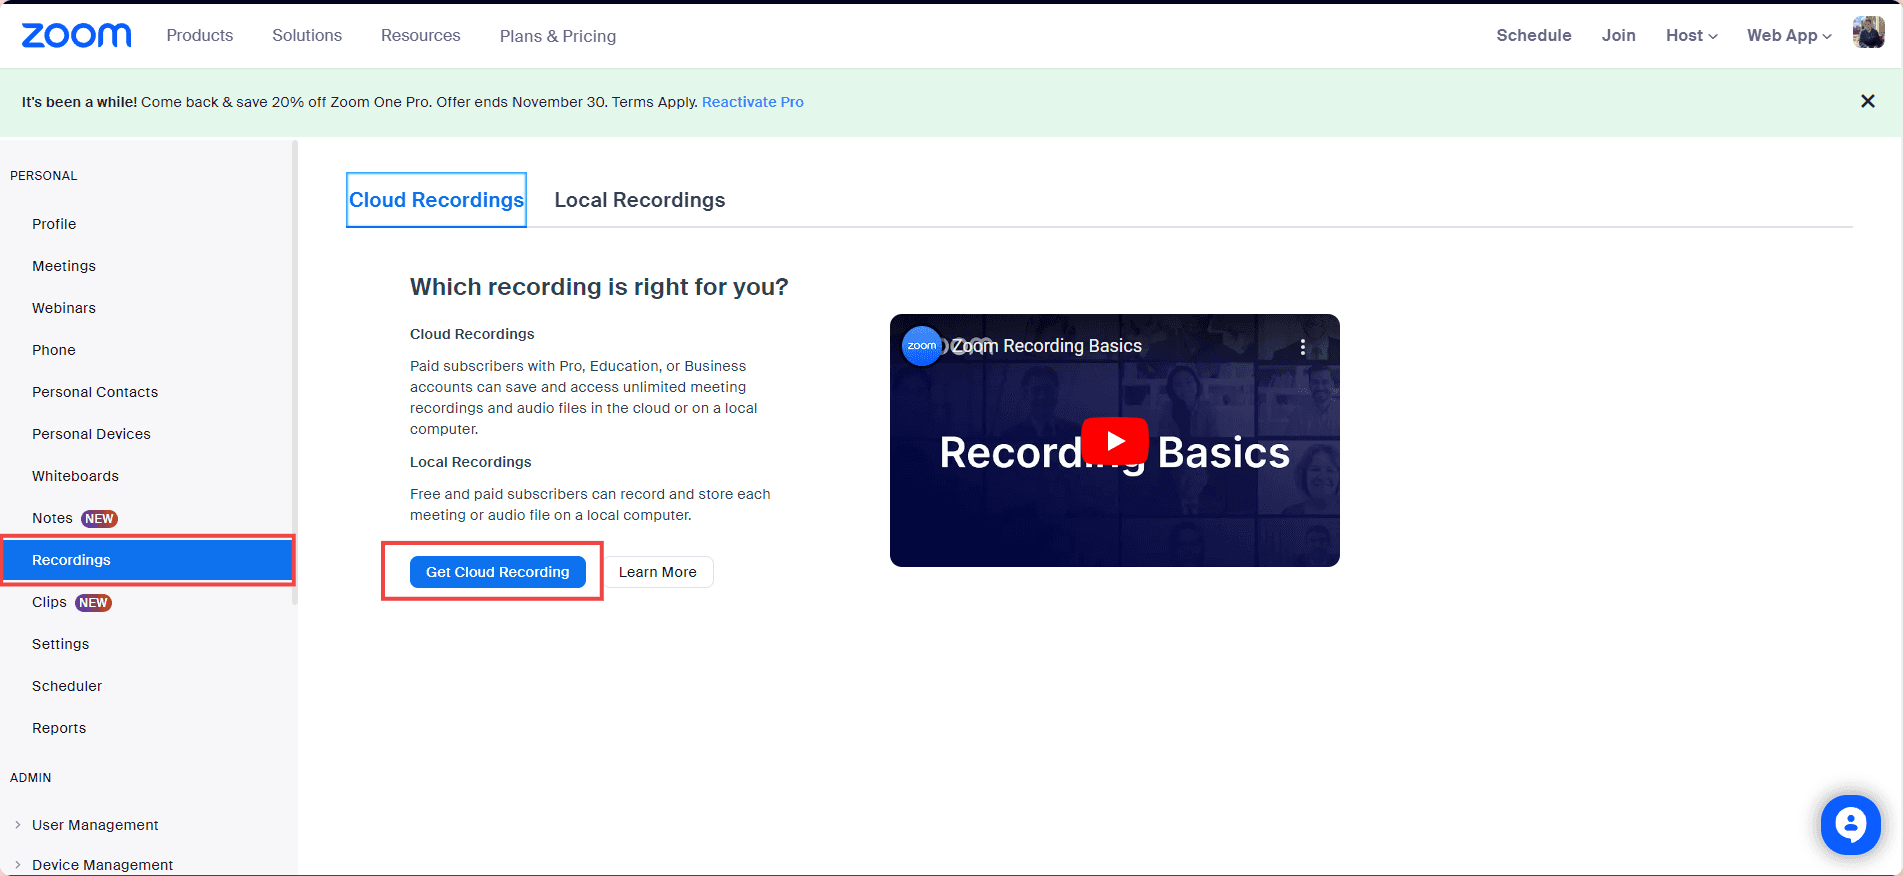
Generate a Transcript: Start a meeting with a screen share only. Once started, hit 'Record' and select 'Record to the Cloud'. Make sure to join with computer audio.
Download the Transcript: After the meeting, navigate to 'Recordings' in your Zoom account. Under 'Cloud Recordings,' find your session. Click on 'More' and select 'Download'. Look for a file with a .vtt extension - that's your transcript.
Convert the Transcript: Open the .vtt file with Microsoft Word. After reviewing and editing, save it as Word Document or PDF.
Remember, automated transcriptions may contain errors. Always review for accuracy.
A well-documented meeting is an effective one.
Alternative transcript option
If Zoom's automatic transcription isn't available, you have other options to transcribe your video recordings. Online platforms, such as Vizard, offer video-to-text conversion services to transform your recorded content effortlessly.
You will need a video or audio file of your Zoom meeting already downloaded using one of the methods above.
Here's how to use Vizard:
Upload Your Video: Go to Vizard's Video to Text page and upload your video recording. You can also link a YouTube video or Google Drive file using the box at the bottom of the screen.
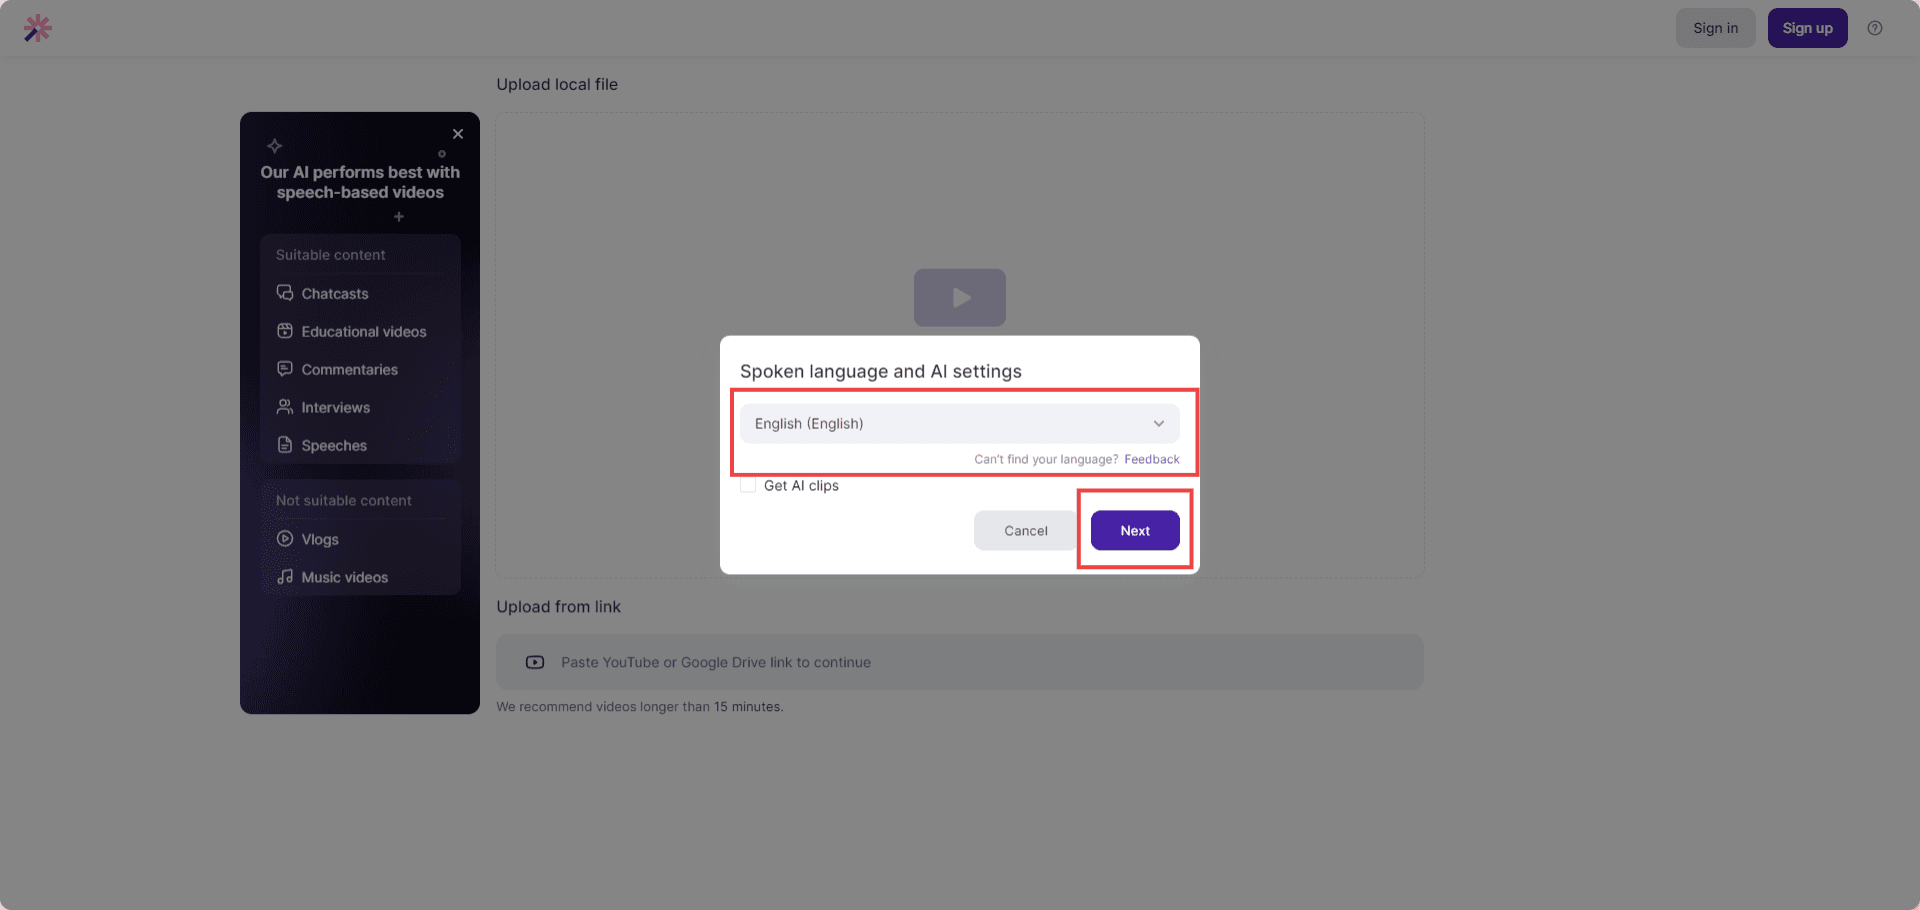
Language Selection: Choose the language used in the video, and Vizard's AI will transcribe everything automatically.
Edit and Refine: After completing the transcription, review and edit the text as needed for accuracy and readability.
Download: Download the transcribed text in your desired file format (copy and paste it out) and use it for various purposes, such as creating a blog post or closed captions for your video.
Using online video-to-text platforms like Vizard is a convenient alternative for transcribing your Zoom recordings when Zoom's in-built transcription service is unavailable. Always ensure you respect the privacy of your meeting participants when using such services.
Record the audio of each person in a Zoom call
If you wish to capture only the audio segment of your Zoom meeting, follow these steps. This method will give you a separate audio file for each participant (as long as they aren't muted), which is ideal for creating quality videos afterwards and listening back without interruption.
Here's what you need to do:
Start Your Meeting: Set up and start your Zoom meeting as the host.
Record Meeting: Access the menu at the bottom of the Zoom window. Find and click on the "Record" option to start recording your meeting. To record a separate file for each individual speaking, select the option in the recording menu. This allows you to have high-quality captures of all participants for whatever use you have.

End Your Meeting: On completion, end the meeting normally.
Retrieve Audio Recording: Zoom will save the meeting in M4A (audio) format along with the MP4 video file. You can locate this in the Zoom folder, typically found in your computer's "Documents" section.
This audio file can be played on most media players. If you require a different audio format, consider using an audio conversion tool to convert the M4A file to your preferred format (like MP3).
That's it! With Zoom, you can effectively record and retrieve the audio of your meetings.
Remember, being an audio-only file, it saves storage space and is quicker to download and share.
Conclusion
In conclusion, recording Zoom meetings for audio, video, or transcripts is useful for records and reference. Recording your Google Meet and Microsoft Teams sessions are also good options. Like Zoom, these tools are relatively straightforward and easy to use. However, to save time on meetings, consider using Tella.
With Tella, you can record, edit, and share asynchronous videos anytime, making communication efficient and engaging.
Embrace this new, creative approach to communication and explore advancements with tools like Zoom and Tella.
By leveraging these platforms, you'll not only savour your meetings but also redefine your communication strategy. Interested in learning more about how Zoom compares to other platforms? Check out our article on Loom vs. Zoom.